Anycubic Kossel Klipper Trigorilla TMC Driver UART Upgrade
Upgrading your stock A4988 drivers to TMC2208 will bring you comfort and the only thing you will hear will be the fans.
You do not need to buy SKR, you can use original Trigorilla board with TMC drivers and UART mode
You can use TMC2208 in a standalone mode (DIY in this article), but I do not recommend it.
It needs to set V ref via potentiometer on each driver and some more modifications.
The best way how to run more advanced drivers such as TMC2208, TMC2209… is UART mode.
UART mode allows you to configure microstepping, current and other parameters via FW on your LCD, via USB and PronterFace or via Octoprint.
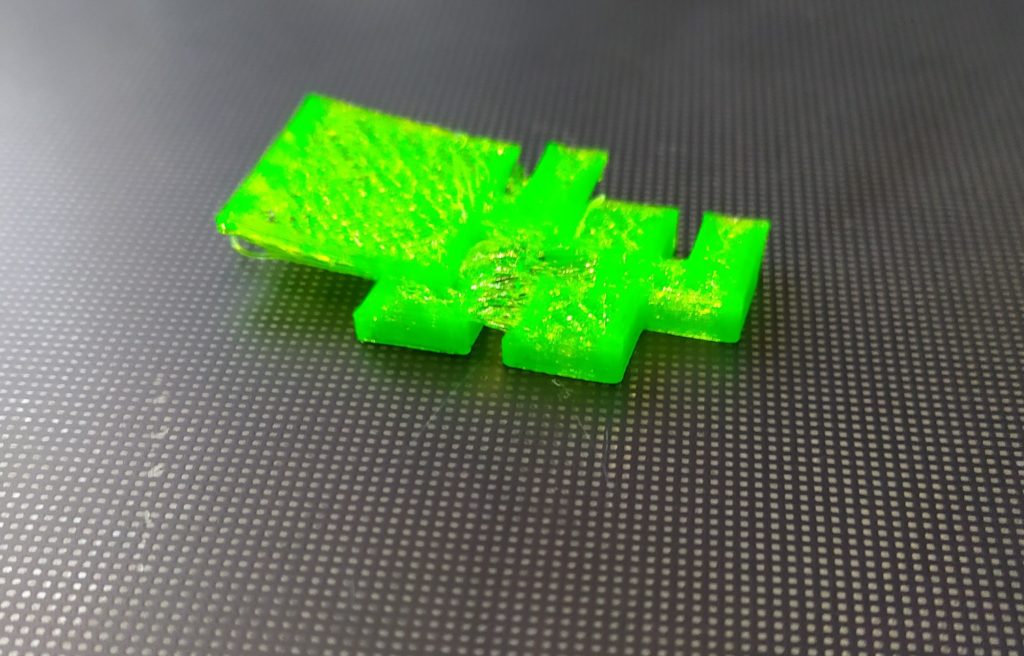
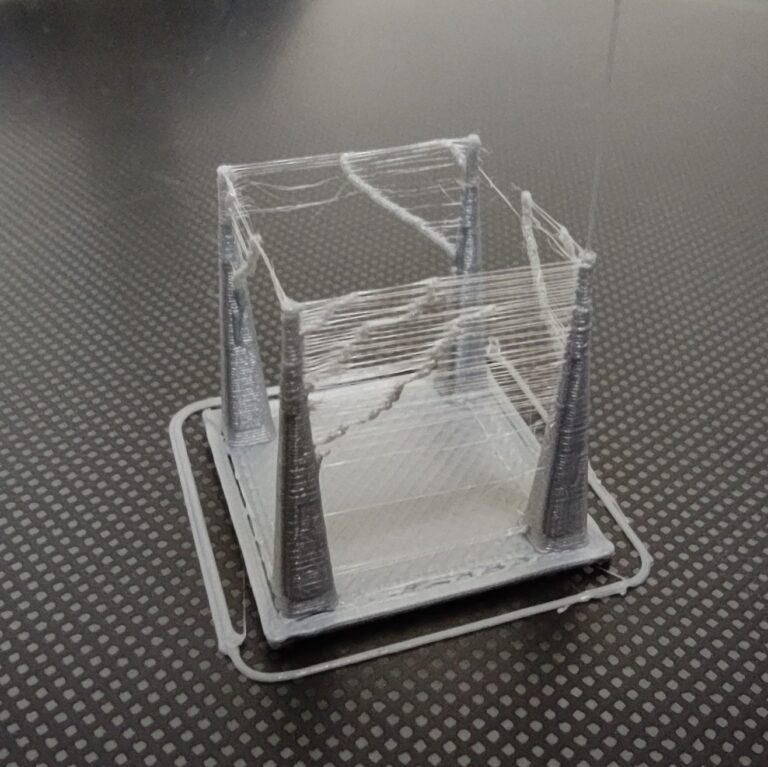
TMC drivers need one more thing and that is an active cooling. You will get serious layer shift without it. These advanced drivers will lower output current if they are really hot and could overheat.
This is what happens without active cooling on.
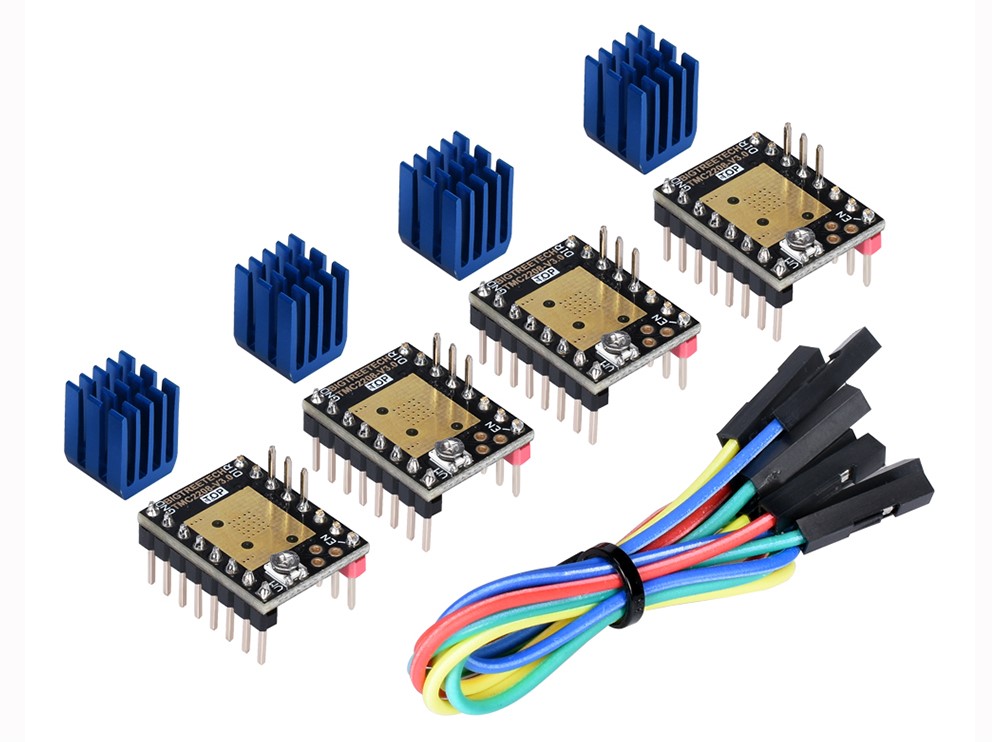
1. Order BTT TMC2208/2209 UART drivers
You have three options:
TMC2209 with UART
TMC2208 with UART
TMC2208 DIY (without UART pads soldered)
Please order TMC2209 or TMC2208 UART, do not buy DIY version.
Also TMC2209 are better, they do not need so much cooling and can provide larger current.
I use 3x TMC2208 for X, Y, Z and 1x TMC2209 for E (I’ve already had 2208, so there was no reason to buy new set)
Do not buy more expensive drivers such as TMC5160, you do not need them.
Also do not buy Fysetc drivers, my configuration files will not work with them, they use another pins and configuration for UART mode.
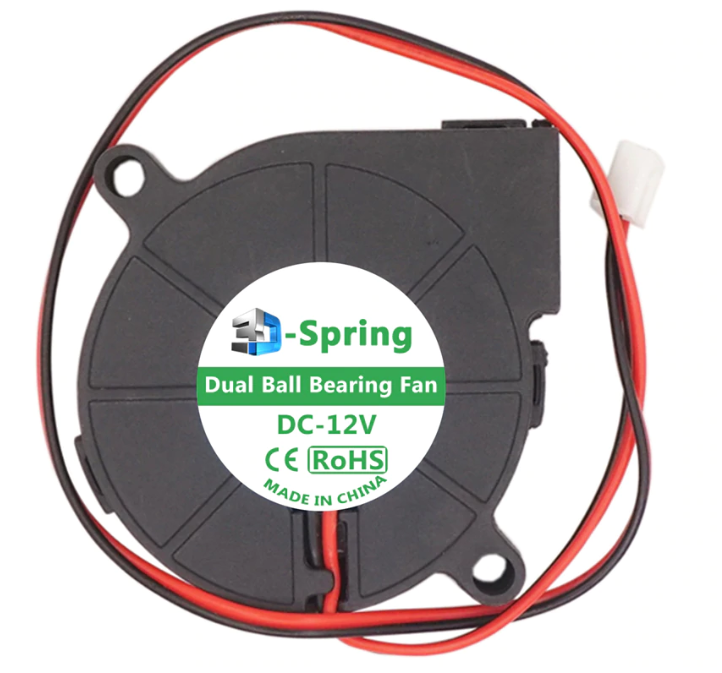
2. Order 5015 radial fan for driver active cooling
Click on the picture and order a good quality 12V 5015 radial fan with dual ball bearing for the cooling tunnel.
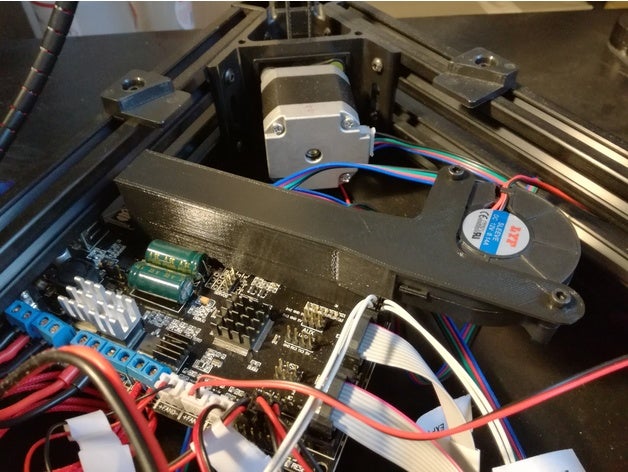
3. Print a cooling tunnel
Click on the picture, download and print the cooling tunnel.
4. Modify TMC2208 DIY drivers
Skip this step if you have UART version!!!
As you can find in a manual: TMC2208-V3.0 manual.pdf there are two possible options for a UART pin.
If you order UART versions, two pads allowing UART mode are already soldered and you do not have to do anything.
If you have a DIY version (standalone mode) just solder these 3 pads together.
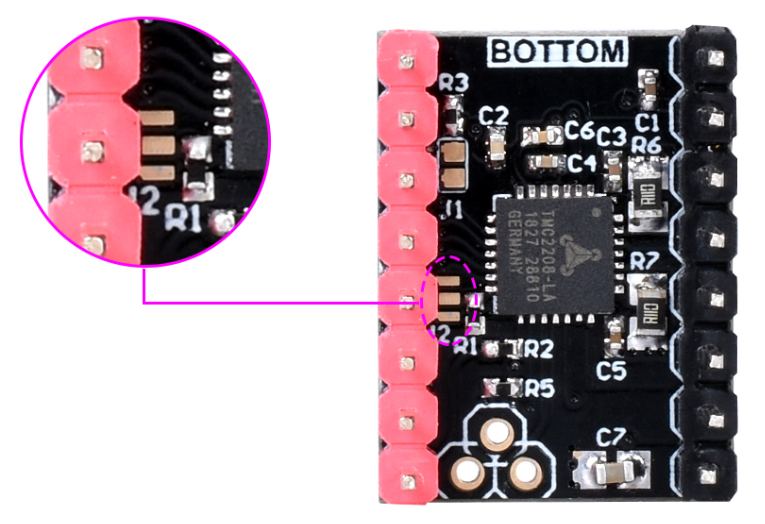
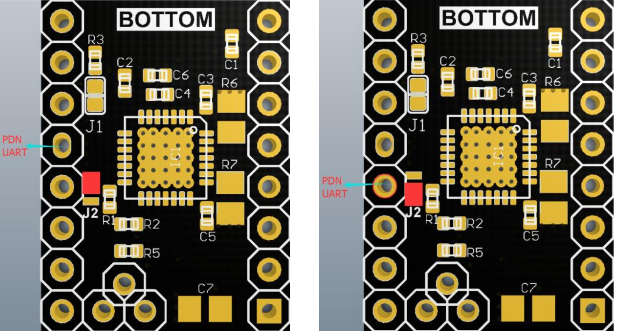
You can see in this picture which pin will be activated for UART communication with soldering 2 different J2 pads.
You can find a lot of posts on the internet saying that you need to solder all 3 pads, but that is a nonsense.
You just need to solder two pads and it is up to you which two, the only difference is what pin you will use for UART connection.
5. Modify TMC2208/2209 UART drivers
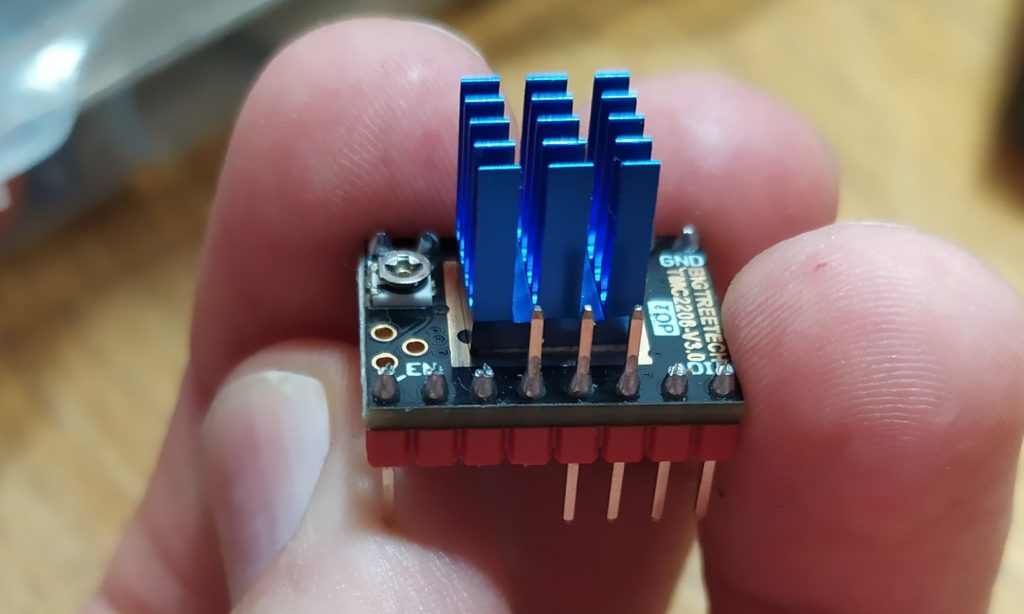
The only modification you should do is cutting out these 3 pins, or bending them heading outside.
6. Solder pins/cables on servo pins
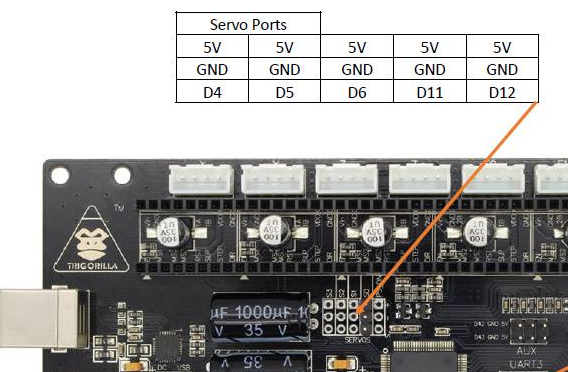
Next step is soldering standard pins on servo ports.
You will only need 4 pins, but I reccomend using 5 pins.
We will use servo ports D4, D5, D6, D11, D12 for UART communication.
As you can see on the driver on the left, you can bend those 3 pins instead of cutting them off.
Solder 5 pins on D4, D5, D6, D11, D12 servo position as you can see in the red rectangle on the right side of the picure.
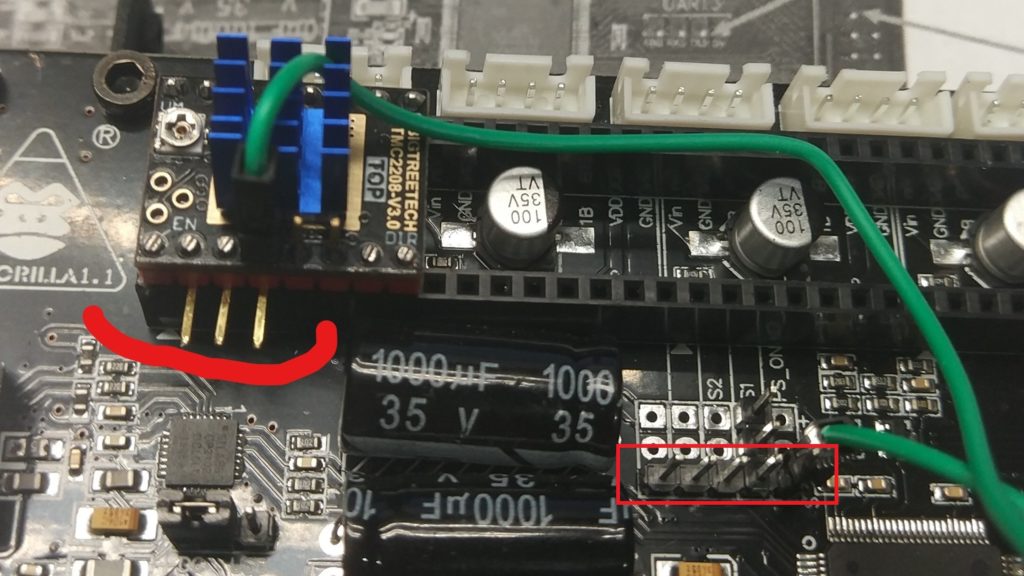
!!!Two servo port options!!!
Please be advised, that there are two different Trigorilla servo port layouts.
D4, D5, D6, D11, D12
D11, D4, D6, D5, D12
7. Driver installation
I recommend starting with stock drivers and only 1 TMC driver, it is better to figure out how to set it up and continue with other drivers.
Insert TMC2208/2209 X tower stepper – stepper_a into the board (with 3-4 stock drivers for Y, Z, E) and use a cable and connect the driver between UART pin on your driver and D4 pin on your Trigorilla board
Please check your UART pin, it depends on J2 pads and how they are soldered together.
This diagram works with BigTreeTech TMC2208/TMC2209 UART drivers.
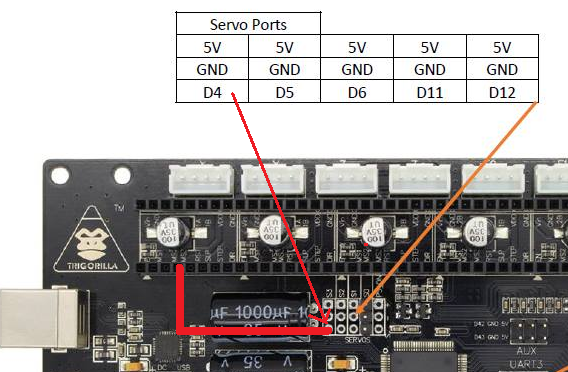
8. Download printer.cfg for TMC drivers
If you are not sure what you are doing, download this printer.cfg file for TMC drivers and Trigorilla board:
Trigorilla and UART TMC2208 Drivers
Please note that the only thing you need to do use TMC2209 instead of TMC2209 is renaming each driver tmc section:
From [tmc2208 stepper_a] to [tmc2209 stepper_a]
9. FW modifications in printer.cfg
We will start with a stepper_a driver (X tower motor).
This is a standard A4988 stock driver Klipper configuration:
[stepper_a]
step_pin: ar54
dir_pin: !ar55
enable_pin: !ar38
step_distance: .0125
endstop_pin: ^ar2
homing_speed: 10
# position_endstop: 295.6
# arm_length: 271.50
For UART mode you have to add UART section.
All necessary settings can be modified here.
The most important setting at this moment is uart_pin, in this case ar4 = D4 on Trigorilla board
If you want to use TMC2209 instead of TMC2208, just rename tmc2208 to tmc2209.
[tmc2208 stepper_a]
uart_pin: ar4
microsteps:16
run_current: .8
hold_current: .4
stealthchop_threshold: 250
This is a complete TMC2208 UART stepper_a configuration section.
If you are wondering why position_endstop and arm_length are commented with #, it is because values are stored in save_config section after delta calibration.
The important thing is to change dir_pin logic from !ar55 to ar55, because TMC drivers use direction pin the other way.
[stepper_a]
step_pin: ar54
dir_pin: ar55
enable_pin: !ar38
step_distance: .0125
endstop_pin: ^ar2
homing_speed: 10
# position_endstop: 295.6
# arm_length: 271.50

[tmc2208 stepper_a]
uart_pin: ar4
microsteps:16
run_current: .8
hold_current: .4
stealthchop_threshold: 250
You can modify this file with :
OctoKlipper plugin Click HERE
Or notepad + upload via SFTP HERE
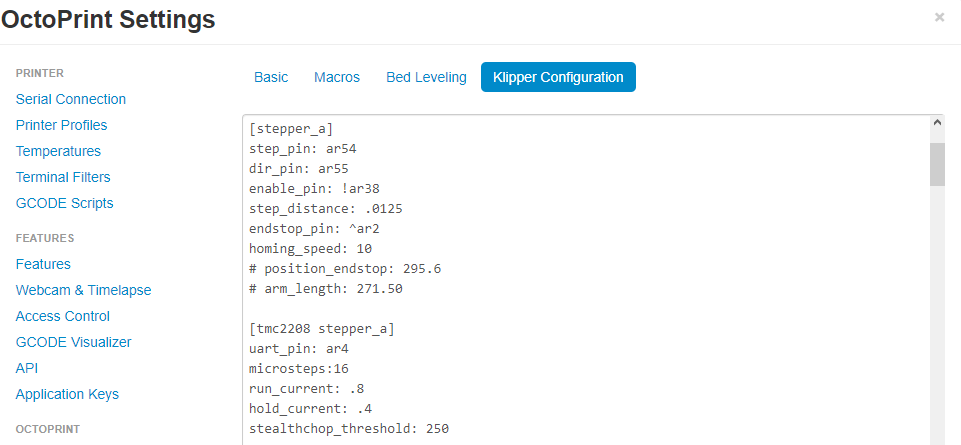
After successfull firmware upload via SFTP / OctoKlipper Configuration modification you should see no error in Terminal.

10. Install all drivers
This is my configuration:
X, Y, Z TMC2208 and E TMC2209.
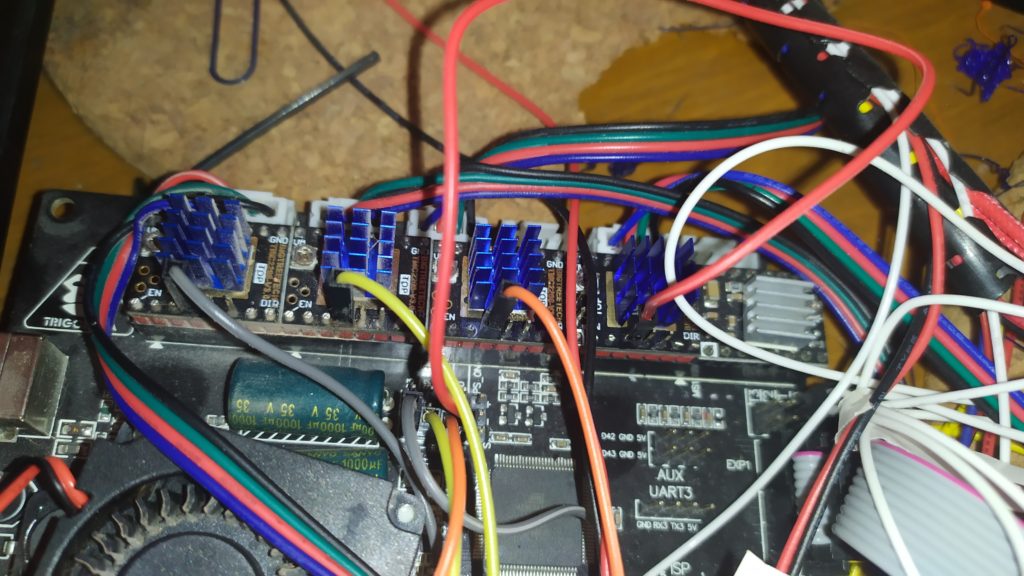
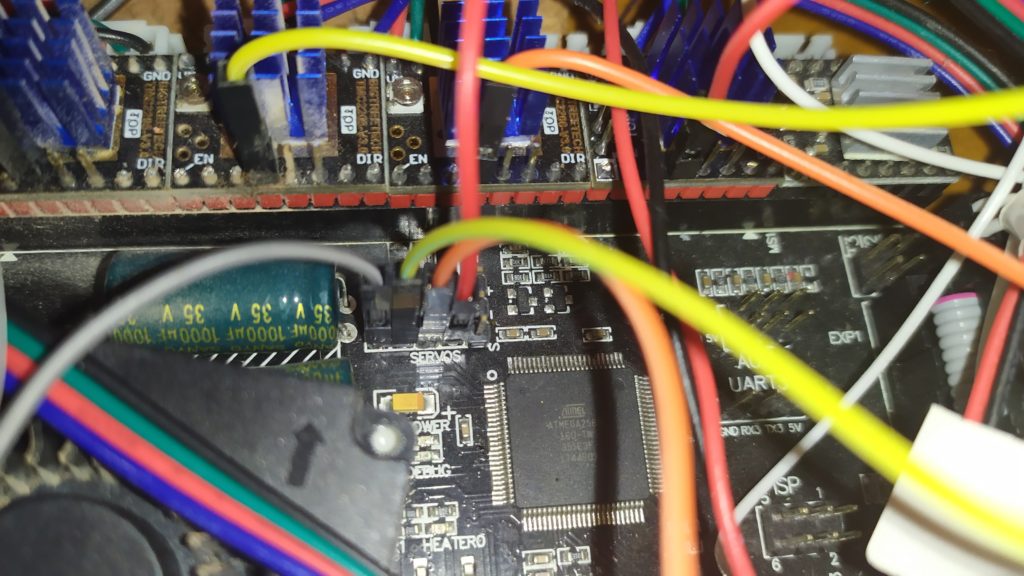
Do the same modifications for all drivers:
stepper_a, stepper_b, stepper_c, extruder
You can use this printer.cfg file:
Trigorilla and UART TMC2208 Drivers
11. Install active cooling
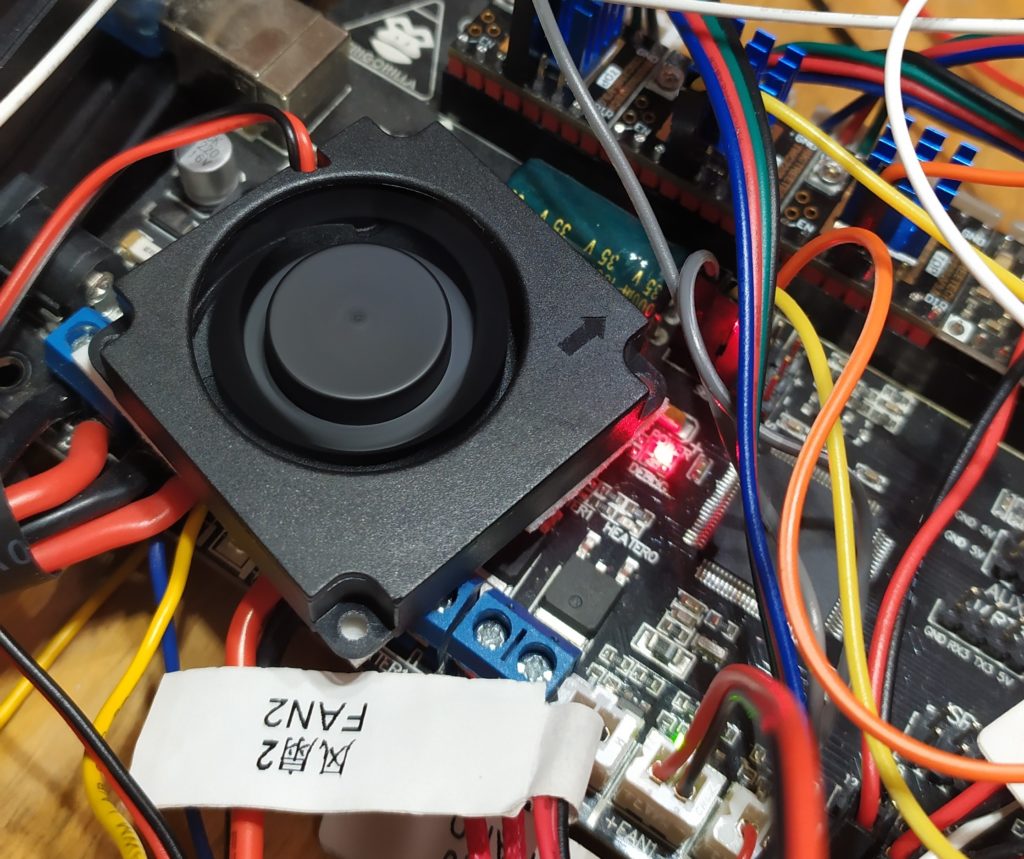
Install active cooling tunnel fith a fan and insert the fan connector into FAN1 – ar7 connector on your board

I did not print the cooling tunnel before this modifications, so I was not able to print without active cooling.
So I applied some “slav science” or also “ghetto solution” and used somedouble sided tape and a 4010 fan.It has been working without any problem for about 8 months.
12. Driver cooling fan FW modifications
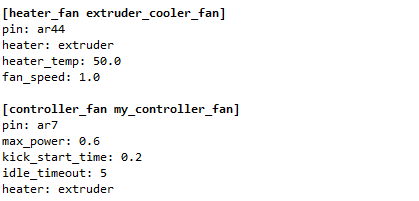
Code below controls the driver cooling fan (controller_fan).
This fan is “connected” to extruder – extruder starts heating up, fan start 0.2 second after that at 60% speed.
[controller_fan my_controller_fan]
pin: ar7
max_power: 0.6
kick_start_time: 0.2
idle_timeout: 5
heater: extruder
I have this code under the heater_fan section like this:




Dear Lukas!
Your site is amazing! Much respect for him.
Although I now want to connect a Chiron to Uart mode with a factory board (Trigorilla 0.0.2 motherboard), the point is the same. I’ve looked at your site before and I definitely remember that you seem to have put a resistor on the UART cable, but I don’t see that here. Could you help me with what kind of UART cable is needed now? Thank you in advance and I wish you a lot of patience with the site.
Hi! Thank you.
I haven’t used any resistor, there was no need.
You can use standard cables with connectors for Arduino.
If you use the TMC2209 V2.0 model, I can’t seem to find any with pins on the top. would you use the three bent pins instead to connect to servo?
Hello mate, i did your guide and my printer works great but y don know how to set the current on the stepper driver by de the printer.cfg. I tried it but didnt make anything, i mesured the voltage with a multimeter and it set as i did with the pontenciometer in the first stage of the printer. If you know how can set it by the printer.cfg I will be very grateful to you.
Thanks
Hi, you can use this guide:
https://www.klipper3d.org/TMC_Drivers.html
I already read it and dont talk about that, my question is if i need to add more wires to manage the current by the firmware on klipper?.
Thanks.
Hi,
Thanks for an excellent write-up, it really helps first timers like myself understand the details of what needs to be done.
I do have a question regarding the 3 pins that need to be cut/bent.
I have Trigorilla 1.0 on Anycubic i3 Mega, and I’m setting up TMC 2209 from Bigtreetech v1.2
https://github.com/bigtreetech/BIGTREETECH-TMC2209-V1.2
It seems that you are cutting/bending MS1, MS2 and PDN pin (the default UART pin)
I do understand the need to cut the PDN pin to avoid any potential connection to the board, but why is MS1 and MS2 have to be cut?
How would Microstepping work with those cut out?
Looking at another write-up of similar work here
https://www.rctruckstips.com/link-uart-of-tmc2208-or-tmc2209-to-trigorilla-board.html
I see that the Second PDN and the CLK pins are being cut instead of MS1 and MS2 (of course in addition to the main PDN pin)
I’m confused which is the correct thing to do.
Would you care elaborate before I make the cut to avoid any problems?
Many thanks
BB
Update:
I followed your guide and cut the pins you highlighted, worked fine.
Thanks for an excellent write-up
So which pins should be cut? According to pictures in this tutorial, Lukas claims that MS1, MS2, and PDN-UART.
On a page referred to by Bing PDN and CLK is to be removed.
If both are working, and in both cases PDN-UART pin is common cut, I removed only this PIN and connected drivers. All drivers were identified (currently Klipper uses different pin names, and doesn’t support “microsteps” param in the tmc stepper configuration, so I had to change a bit in the configuration provided in the article as examples – if anyone’s interested I’ll post up the configuration in a separate comment), worked properly, and even I did a callibration once.
Unfortunately I started to get “unable to read tmc uart ‘stepper_b’ register IFCNT” after a while so I guess it’s the matter of removing some PINs as it was mentioned in comments that without removing there are communication issues. But which PINs should I remove? I don’t want to remove the wrong one – removing is way easier than adding it again 😉
Just a sec ago I noticed that Lukas posted the updated printer.cfg for TMC2208 here https://www.lpomykal.cz/anycubic-kossel-klipper-configuration/ – I got same result by by modifying config on my own, just spent a bit of time on that 🙂
Hi Lukas,
I installed btt 2209 v1.2 with uart mode on my trigorilla 1.1
I think I miss something because I want to try sensorless homing on that board but klipper need a diag_pin on the board and clearly trigroilla does not connect that pin like skr does. btt have a pin already soldered so id tould be connected to something if possible
searching does not help me either
Hi, you would need to connect those extra pins via extra wires to another free pins on the board.
But I would not recommend it, end stops work well.
Thanks for a great site for start! Got a question, does the TMC2209 V2 MKS work? https://www.banggood.com/MKS-TMC2209-V2_0-3D-Printer-StepStick-Stepper-Motor-Driver-2_5A-UART-Ultra-quiet-High-current-Unlimited-Return-to-Zero-For-SGen_L-Gen_L-Robin-Nano-p-1664779.html?utm_source=google&utm_medium=cpc_ods&utm_campaign=nancy-content-sdsrm-baby-acc-login-content&utm_content=nancy&gclid=Cj0KCQjw5auGBhDEARIsAFyNm9ERstRfMveTh4-g8t0N6YFZ89PR8zfa_OYDE16ftG2QLldbBabe5nwaAif-EALw_wcB&cur_warehouse=CN
I tried this exact model and it’works.
I am Having some difficulty with this. Not sure what I am doing wrong.
Anycubic Kossel Linear Plus
First thing I did following the guide I installed the TMC2209 Stepper Drivers (Removed the 3 pins and I soldered header pins on the board installed jumpers and cooling fan. I downloaded your printer.cfg (the only changes I made where changing tmc2208 to tmc2209) followed the guide for installing klipper on Octoprint. I seem to run into an issue after I get the results “/dev/serial/by-id/usb-Silicon_Labs_CP2102_USB_to_UART_Bridge_Controller_0001-if00-port0” then I enter command: sudo service klipper stop. I get Sudo: unable to resolve host octopiAKLP: Name or service not known. I try a couple times same result. So I move forward and run command: make flash FLASH_DEVICE=/dev/serial/by-id/usb-Silicon_Labs_CP2102_USB_to_UART_Bridge_Controller_0001-if00-port0 when its done I Send this command to start Klipper service:
sudo service klipper start and same thing. Sudo: unable to resolve host octopiAKLP: Name or service not known. I then lconnect to octoprint via web browser. Klipper cant connect. I check the printer and the screen is frozen and the control knob does nothing. I turn it off and back on. Its like there is no firmware on the printer blank screen. I then install your marlin firmware back onto the printer and tried again. Same results 3 times.
Hi, I would start with the fact that your octopi is named as octopiAKLP.
The easiest way is to start over with a clean install.
That fixed it. Clean install on the octopi.
Hi,
just a note about the pins and the tmc2209. These steppers are addressable and you can address up to 4 steppers with one pin on the board. In order for this to work you have to do the following things
1) The trigorilla boards sets MS1 & MS2 fixed to high. So each of the 4 steppers needs a different combination of MS1&MS2 bending of the pins to assign a different address to the stepper.
2) In the klipper configuration assign “uart_address” to the stepper.
Till now I haven’t seen any drawbacks of this setup.
Thank you!
Would you consider doing an addendum to this to add BLTouch as well? Asking because I am trying to figure out how use BLTouch and UART. Sadly, I’m finding it difficult to do.
Hi, I do not own that probe 🙁
Hey, I’m having the “unable to read tmc uart ‘stepper_x’ register IFCNT” problem. I’ve tried the solutions mentioned here, but none of them have worked. Any ideas?
Hi Jacob,
post a picture of your wiring, UART configuration and picter of driver where UART pads are visible.
Hi,
first of all thanks for all your great work.
I just upgraded to TMC2209 (of course also running into the “Unable to read tmc uart ‘extruder’ register IFCNT” topic). Now moving seems to work, I can home, but whenever I try to move x, y or z I get the message “Move out of range”
Send: G1 Y-1 F6000
Recv: !! Move out of range: 1.276 -8.159 272.557 [0.000]
Any idea what to do/where to look ?
For everyone running into the same issue:
after deleting all the SAVE_CONFIG lines (all lines starting with #*#) and uncommenting a few values needed by DELTA_CALIBRATE command (Klipper was telling me which ones were missing/usually commented by the DELTA_CALIBRATE/SAVE_CONFIG procedure) and running the CALIBRATE/SAVE cycle I was able to print again.
Still I don’t understand why this is necessary/helped because I didn’t change anything mechanical in between …
Frank
Hi, did you try to calibrate it before?
It is possible that you have had some wrong values from unfinished calibration in that part of the config file.
Hi, it is possible that you have some really weird values in the calibration part.
If you get “Unable to read tmc uart ‘extruder’ register IFCNT” double check which pin you have the extruder connected to, D11 or D12
https://cdn.thingiverse.com/assets/32/8c/6d/ab/5b/TriGoRiLLa_PINs.pdf
and ensure your config matches.
To understand if your ports are
D4, D5, D6, D11, D12, (v1) or
D11, D4, D6, D5, D12 (v1.1)
look at the logo in the top left on the board. If it just says “Trigorilla” you have v1, if it says “Trigorilla 1.1” you have v1.1.
See pics here for the logo:
https://github.com/MNieddu91/Marlin-AI3M-BLTouch/wiki/Changes-for-Trigorilla-1.1
This helps with the pin layout:
https://cdn.thingiverse.com/assets/32/8c/6d/ab/5b/TriGoRiLLa_PINs.pdf
Thanks!
thanks so much for your help
Hi, great article! Can this upgrade be also applied to Anycubic Mega-S? I am only waiting for the printer to arrive, so I am not sure exactly which board it has. I am considering swapping the original drivers for TMC 2209, preferably in UART mode. Thanks.
Hi!
It can be.
TMC2209 can work in both modes without modifying anything on the driver.
Just switch motor wires / direction in FW and you are good to go.
I am not so sure about Klipper, I have not tried it yet.
It will work, but I am not sure about the touch LCD…
Thank you. I just opened my my i3 mega S to finally see which board I have and I am confused now: It says “TriGorilla_V0.0.2.” without any logo. I saw some recent posts and it looks like the most recent printers are equipped with this board. I guess there will be no difference swapping in swapping the drivers in standalone mode, but I can only guess the correct pinout on servo pins…
Could you take a picture of that board?
Thanks.
Here you are: https://imgur.com/a/2kMn4OT
Thanks!
Try both pin configurations, one of them should work.
Start with one stepper and continue with one stepper (UART pin) at the time.
The 0.0.2 board is a Trigorilla 1.0. Makes a lot of sense right? I had thought it was 1.1 initially and had my BL touch connected to the servo pins and i couldn’t get it to work until i changed my firmware from knutwurst 1.1 to 1.0.
Hi, firstly just want to say your page is amazing. Secondly I would like to ask your advice over a issue i am having changing to TMC2208 UART. I keep getting the message “Unable to read tmc uart ‘stepper_a’ register IFCNT”. I have swapped pins around and changed drivers (even to 2209) but still the same issue. I also get a issue with my printers screen going blank whilst this is happening. can you help?
Thank you!
Double check the UART pin on the driver (there are two options) and try both motherboard pin combinations
Hey Lucas, i have a problem with the configuration of TMC2208 / Extruder. i used the provided printer.cfg, everytime i restart klipper i’m unable to connect the printer. i mentioned that if i comment the extruder tmc2208 section in im able to connect to the printer, but then the extrusion i bad calibrated. any ideas?
Hi, how did you connect UART pins?
What does the Klipper says?
Any error message?
exactly like you
–> Error: Unable to read tmc uart ‘extruder’ register IFCNT” to “Offline (Error: Unable to read tmc uart ‘extruder’ register IFCNT)
Error: Unable to read tmc uart ‘extruder’ register IFCNT” to “Offline (Error: Unable to read tmc uart ‘extruder’ register IFCNT)
same as in your pictures
Try different pin for extruder, or double check the pin type
i think i got it. the provided file came with uart_pin: ar12, but in the picture it is shown as ar11
There are two Trigorilla versions used in these 3D printers with slightly different pin layouts…
It should be in the article somewhere around pin definition.
Hi,
how can I find out, which pin layout applies to me? Is it printed on the board?
Hi, it depends on Trigorilla version.
But the easiest way is to try it with one driver on a pin where the number changes.
It is a 2 minute testing.
I have been trying or a long time but cannot seem to get UART communication working in marlin with the Trigorilla V1 board. I have tested multiple pins but am still unsuccessful
Hi, this is a solution for Klipper.
It is possible that Marlin requires both Rx and Tx pins to work.
You could use UART3 pins on the board, but I have not tried it.
Hi Lukas,
can I use TMC2209 in standalone mode? Just omitt uart_pin?
I have the Fysetc TMC2209 and with Marlin they run fine in standalone.
Thanks!
Hi, it is possible.
Delete all [tmc2208 stepper_] sections and just change direction pin logic like this:
From dir_pin: !ar55 to dir_pin: ar55
Hi
Why is it needed to bend ore clip the 3 pins? Is it Also needed on tmc2209?
Without those pins bended, it sometimes leds to connection problems (some people reported this problem).
Do the same on TMC 2208/2209 drivers.
Hi !
On step 12.( Driver cooling fan FW modifications) how would you do that in Marlin 2.0.X ?
Thanks !
Hi, my Marlin should have this fan port enabled by default.