Anycubic Kossel Marlin firmware

Why should I upgrade stock firmware?
Anycubic Kossel Linear Plus Firmware Marlin 2.0 offers better performance and more options over the stock Anycubic Kossel FW.
Delta calibration works much better then stock bed calibration.
You can easily make changes in FW.
Configuration files have been created for original Trigorilla board and original drivers which come with the printer.
1. Download Anycubic Kossel Marlin
It was time to move on after announcing bugfix Marlin 2.0 and upgrading the printer to E3D V6 extruder.
I have been testing this firmware almost every day this week with no issues.
You can find 2 different configurations of PID values in the file.
One is for original V5 J-Head and the second is for E3D V6 extruder + new extruder fan.
Configuration files are modified for Anycubic Kossel Linear Plus with original Trigorilla board and steppers.
You can easily modify them for another board such as SKR 1.3 or newer stepper drivers.
Official Marlin 2.0.0 version. 02. 12. 2019 (US 12/02/2019) version
Older version with some bugs – baby stepping, lcd sometimes freezes.
If you want to use an older Marlin version, you can download 1.1.9, but steps in this guide follow only Marlin 2.0 installation.
Flashing Marlin 1.1.9 is similar, but the calibration steps are a little bit different.
Original Anycubic Kossel Linear Plus FW
2. Download and install Arduino IDE
I prefer direct download from arduino.cc.
Arduino IDE installed from the Windows Store is known for issues (I hope that they will fix it ASAP).
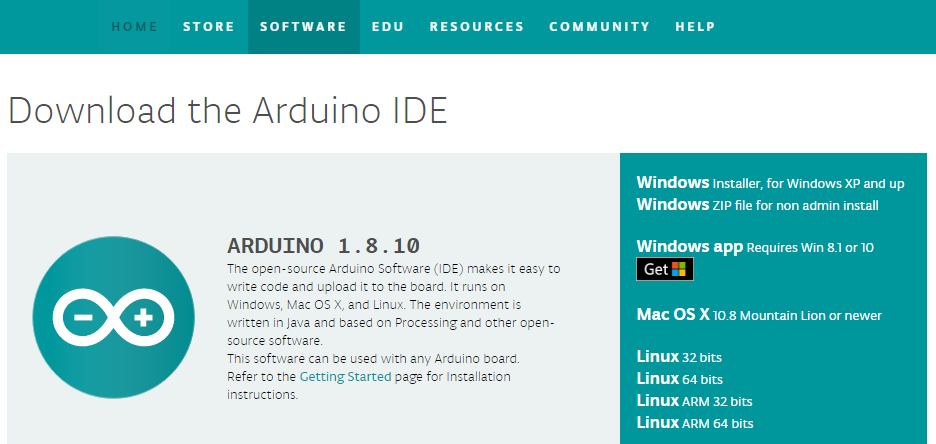
Click on Download Arduino IDE, choose a version for you operating system, download and install
3. Connect Kossel to PC via USB
Use the USB cable that came with the printer or a standard USB-B USB-A cable and connect Kossel to your PC.
Turn on the Kossel.
Go to device manager (WIN10 – right mouse click on windows logo, device manager) and you should see Silicon Labs CP210x device under COM ports.

4. Modify Configuration.h
Go to the folder you have downloaded Marlin to (Downloads usually) and extract zip archive.

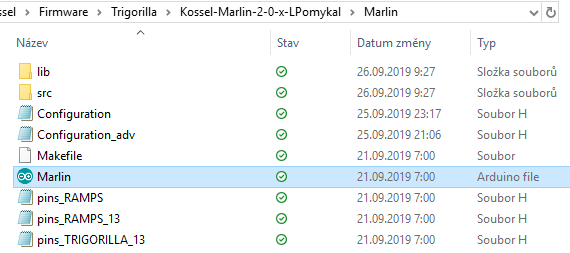
For Marlin 2.0 go to Kossel-Marlin-2-0-x-LPomykal then to Marlin folder and open Marlin.ino in Arduino IDE.
4.1. Kossel type
Firmware is prepared for a Kossel Linear Plus, but if you want to use it for a pulley version, just modify this one line.
Kossel Linear Plus – define it:
#define ANYCUBIC_KOSSEL_PLUS
Kossel Pulley version – comment the line:
//#define ANYCUBIC_KOSSEL_PLUS

4.2. Autoleveling probe type
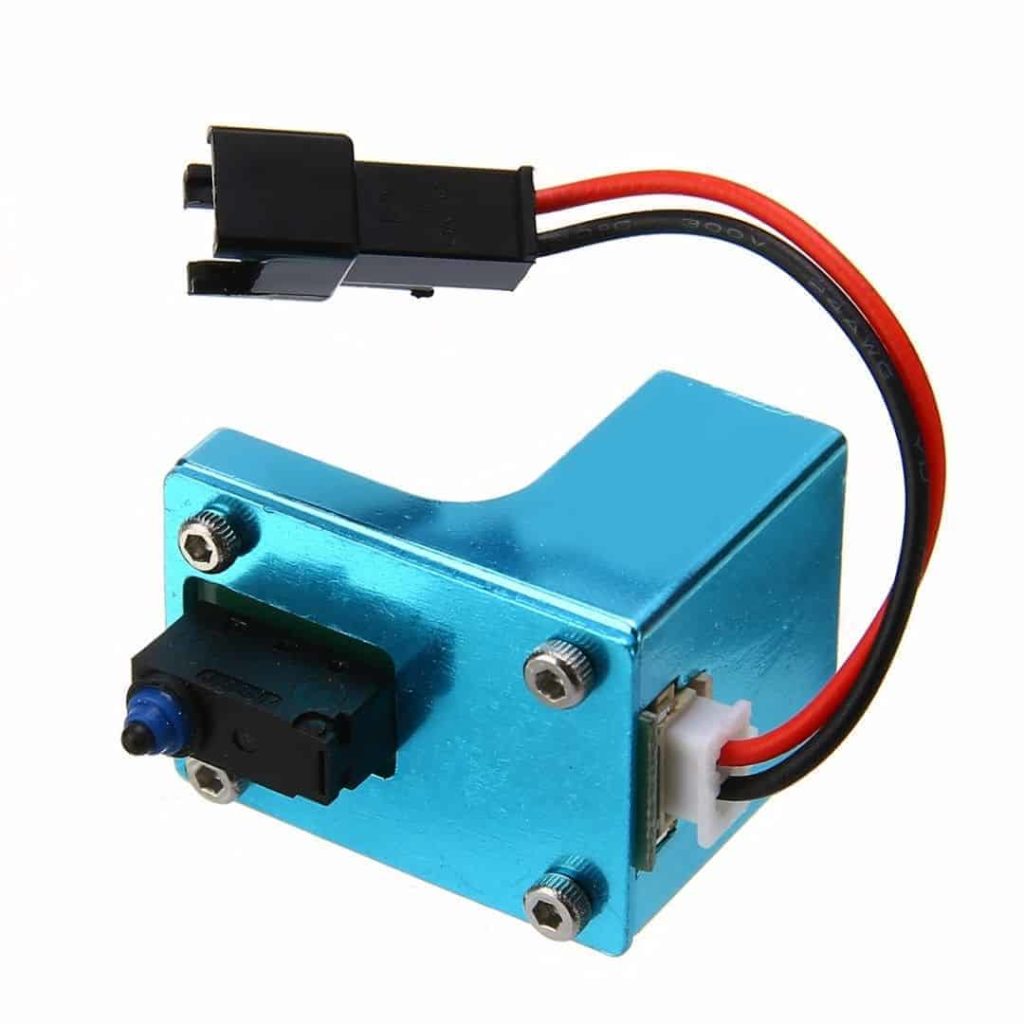
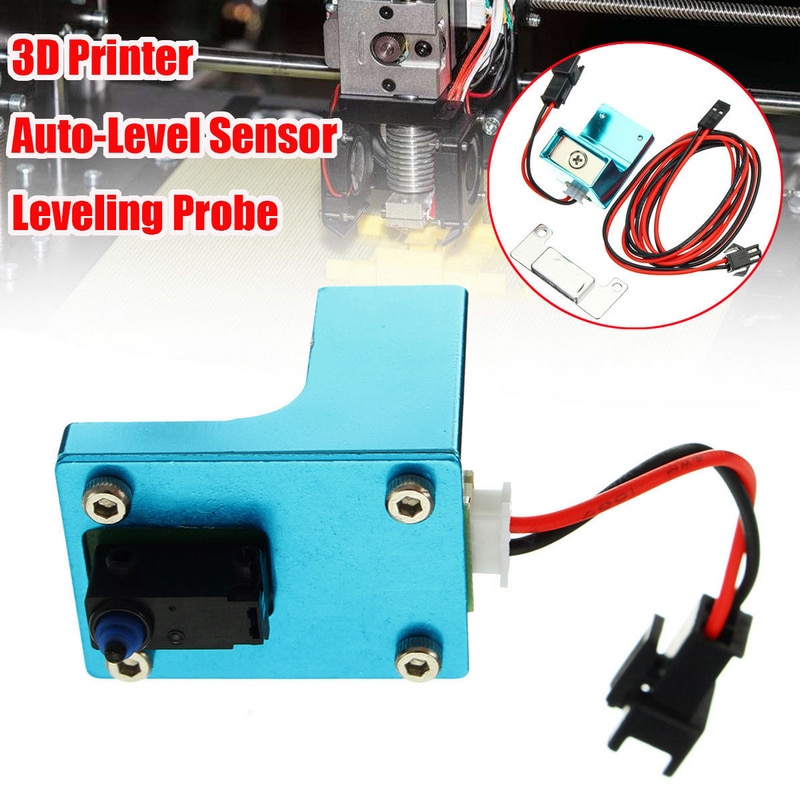
This is the standard autoleveling probe which comes with the printer since 2017.
If you have received another type (microswitch is different), your probe is probabably type 1.
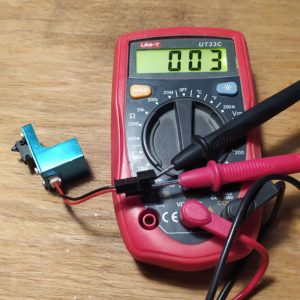
If you have a multimeter, you can easily check that. Probe 2 is a NC – normally closed which means that it is normally switched on, so you will read a very low resistance or you can beep the contacts.
Choose the correct version probe version.

4.3. Bed type
Make sure you have chosen the correct bed type.
If you want to modify it, simply change:
#define ANYCUBIC_KOSSEL_ENABLE_BED 2 to:
0) No heated bed:
#define ANYCUBIC_KOSSEL_ENABLE_BED 0
1) Standard heated bed with a black sticker:
#define ANYCUBIC_KOSSEL_ENABLE_BED 1
2) Ultrabase + heated bed
#define ANYCUBIC_KOSSEL_ENABLE_BED 2

4.4. Printable radius
Here comes the tricky part:
Kossel Linear Plus comes with a heated bed with a 230 mm outer diameter.
Ultrabases for the Kossel are made in two outer diameters: 200 mm and 240 mm.
In my case I have a standard 230 mm heated bed with a mouted 240 mm Ultrabase and that means that my printable radius is: (240 mm – unreachable space (10 mm usually))/2 = 115 mm.
Please note that DELTA_* must be defined as a floating point number!
Do not forget to add .0 behind each value.
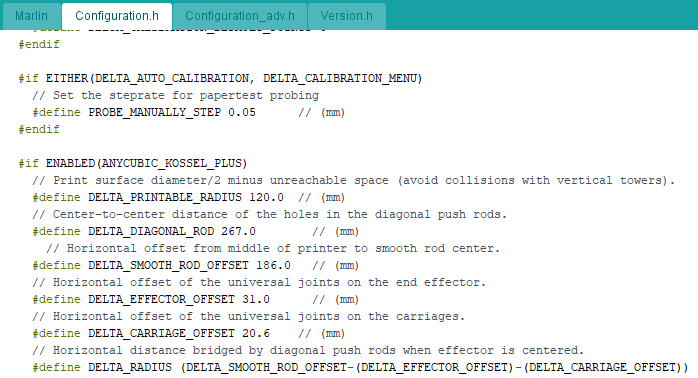
4.5. Rod lenght
Measure the correct lenght of your rods by disassebling and measuring them with a sliding meter axis to axis – hole diameter and correct the value
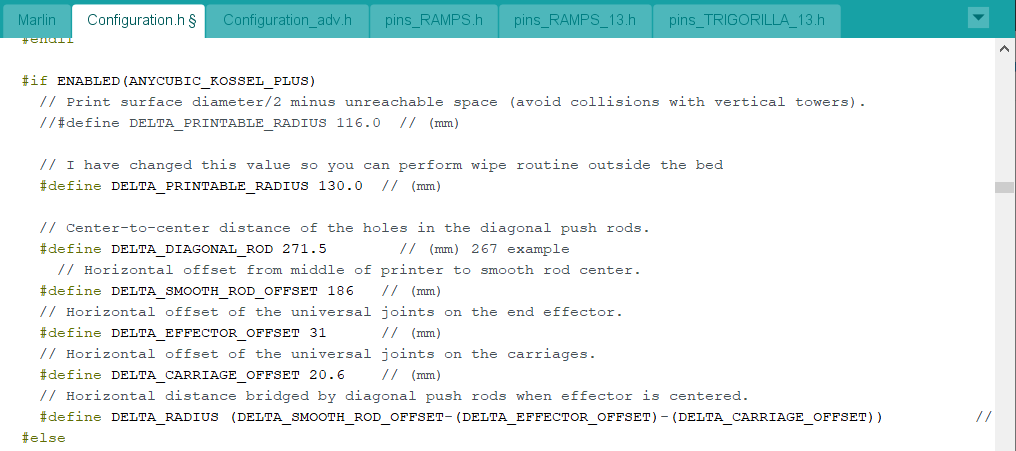
4.6. Probe edge
If your printer is probing very near the edges of the bed, you could modify this parameter.
It is a minimal distance of the probe’s microswich from the edge of the bed.

4.7. Safe zone – moving the head down after G28 – home
This variable causes the printing head to move approx. 50 mm down after homing at the end of a printing session.
If you are going to print tall models, please comment this line:
#define DELTA_HOME_TO_SAFE_ZONE

4.8. Maximum speed
A standard Kossel without corner reinforcements, belts well tensioned can do about 60mm/s max.
If you have these upgrades, you can easily achieve 100mm/s and even larger speed.

4.9. Maximum acceleration
You can define maximum acceleration values in this part of the configuration file.
Just keep in mind, that if you want to print with higher acceleration, the FW will not allow you to do that.
I consider these values as a “failsafe” against too high acceleration values.

4.10. Restore autoleveling
This is almost critical.
For anyone using another FW, check if this line is defined.
It ensures that after a reboot, the printer will still use values from your delta calibration.

There is also another solution:
Placing M420 S1 after G28 in start G code in your slicer
4.11. Homing speed
Homing speed is a crucial setting. It allows you to lower homing speed making homing and calibration more precise.
Instead of a fast homing and “crushing” into end stops you can slowly approach and trigger them.

4.12. Probing speed
XY_PROBE_SPEED – XY movement between probing points in mm/minute
Z_PROBE_SPEED_FAST HOMING_FEEDRATE_Z – slow probing speed is equal to HOMING_FEEDRATE_Z
Z_PROBE_SPEED_SLOW – slow probing speed set up to a one third of Z_PROBE_SPEED_FAST

5. Upload new Marlin FW
In Arduino IDE click on Tools and choose Mega 2560 as a board and ATmega2560 as a processor.
Pick the correct COM port (you can check that in device manager, com ports).
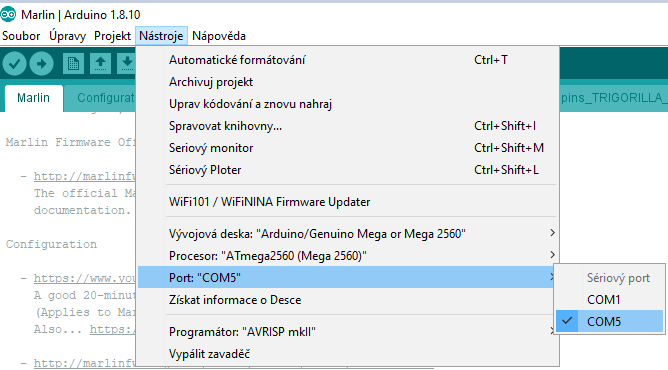
Click on Projects and upload.
Or simply use Ctrl + U shortcut.
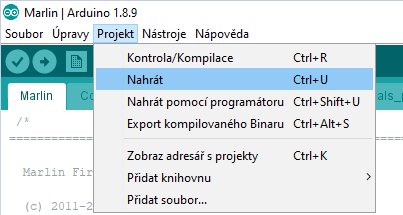
The moment you see Upload complete you can disconnect the printer and calibrate your bed.

6. Delta calibration
This important calibration measures each end stop’s position and arm lenght.
Is also auto levels your bed.
7. Hotend PID calibration
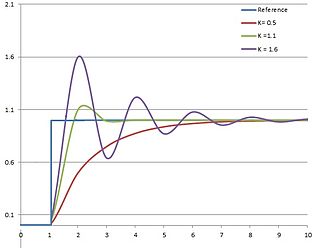
You also should perform PID calibration to get rid of any thermal runaway problems.


First of all I want to thank you. I have a Linear plus that stopped working, I think the original firmware was faulty.
With the Marlin 2 version upgrade, it finally works again and much better.
However, there is a problem and I can’t find the arduino code command to fix it.
Analytically.
Printing has started. The bed reaches, for example, 50 Celsius and the nozzle is heated to, for example, 200 Celsius.
Until the head heating stabilizes there is an upward trend in nozzle temperatures of 195-205 Celsius.
Unfortunately, if it is not exactly 199-200 Celsius, the device does not start printing. Sometimes they wait even 15 minutes!!!.
What should I do?
An option in the code is (if nozzle temperature >= preset temperature) {start} else {wait}
I await your opinion
ahoj prosím je možno pořídit tiche drivery a přitom zůstat na Marlinu ? že je ten upgrade v kategorii klipper dík moc za odpoved chystám se ztišit mýho postaršího kossela
Ahoj,
jasne, neni problem.
Ve zkratce – pokud nepotrebujes UART, staci koupit TMC2208 nebo 2209, nastavit na nich pomoci multimetru pozadovane U ref = nastaveni proudu (tip – vychozi nastaveni vetsinou neni treba menit).
Pak v Marlinu pouze zmenit smer otaceni a je to.
dobrá nikdy sem marlin nekompiloval zkouknu nějaký videa a pustím se do toho. pokud pujde jen o upravu tak to bych moch zmáknout . chápu dobře že pokud nepojedu s UART tak nemusim přepojovat ty kablíky od driverů ? jen bych vyměnil staré drivery za nové ? dík moc za jakoukoli pomoc
Presne jak rikas.
Pokud nepotrebujes UART, nemusis pripojovat dalsi vodice.
vše sem udělal naučil se kompilovat marlina přepsal drivery a vše jede . na chlazení driverů mam zatím 40X40 a vypadá to že stačí jen bych potřeboval poradit jak v marlinu napsat aby jel FAN 2 jel od zapnutí tiskárny nejlepe aby se začli chladit se zapnutim . zatím to dělám v menu tiskárny . dík moc za tvoje návody a dík moc za radu
Hi Lukas,
I hope you are well.
Thank you for developing this page, I am currently using your E3d V6 upgrade- Brilliant.
Please assist if possible; I am trying to flash firmware to restart machine after making changes to the board.
I have updated Arduino IDE to the latest and it is giving me this error message;
SanityCheck.h:34:4: error: #error “Versions of Arduino IDE prior to 1.6.8 are no longer supported, please update your toolkit.”
#error “Versions of Arduino IDE prior to 1.6.8 are no longer supported, please update your toolkit.”
^~~~~
exit status 1
Compilation error: #error “Versions of Arduino IDE prior to 1.6.8 are no longer supported, please update your toolkit.”
I am not sure what to do?
Hi Tahir,
your Arduino IDE is old, update it to a newer version and you should be good to go.
Thank you Lukas,
I have doneso but now it presents a new error message:
Sketch uses 181000 bytes (71%) of program storage space. Maximum is 253952 bytes.
Global variables use 5159 bytes (62%) of dynamic memory, leaving 3033 bytes for local variables. Maximum is 8192 bytes.
That is only a warning, not an error message.
Dear Lucas,
I am not a Pro. I am using a Kossel Linear Plus with a new Hotend and new Board with your frimware. Could you please tell me the steps to go to do a perfect leveling. I am not familiar with the new functions Bed leveling and Delta Leveling. It is also interesting where to input values to fine tune the level values due to the length of the hot end of the extruder.
Thank you for your help.
Best regards from Germany
Guenter
Dear Sirs,
I installed the firmware 1.1.9 on my Lienar Plus. It works without any modification.
I also installed an new extruder hot end.
The menu itmes are quite different from the standard firmware menu. Can anyone help me to give information about the steps to go to calibrate the extruder (Delta Calibration)? I am not a Pro I understand that the distance between calibration sensor is fix but the distance from the top of the hotend may vary to my old one. Weher to fine tune auto. calibration values?
Thank you for your help
best regards Guenter
hello Lukas,
testing the latest version 2.0 the fan_0 has stopped working for me, where can I activate that fan in marlin, I’m looking in congiguration_adv.h but I can’t find it
Hi, it is possible that you have those fans connected do not correspond to Marlin FW configuration.
Try to switch fan 0 with fan 1.
this is my problem that I can’t find any parameter that defines the height, the firmware is the newest version of marlin 2.0 that is in this blog to download
You can also edit it via LCD on the printer.
https://www.lpomykal.cz/kossel-bed-calibration-marlin-fw/
Hello Lukas, I have already selected the no plus version, and I have tried to change the height parameters in these lines
#define X_MIN_POS – (DELTA_PRINTABLE_RADIUS)
#define Y_MIN_POS – (DELTA_PRINTABLE_RADIUS)
#define Z_MIN_POS 0
#define X_MAX_POS DELTA_PRINTABLE_RADIUS
#define Y_MAX_POS DELTA_PRINTABLE_RADIUS
#define Z_MAX_POS MANUAL_Z_HOME_POS
both the z_max and the z_min by numerical values but no change, the machine goes down until it remains a few centimeters and when it does not arrive it puts a failed probe
What parameter should I change to make it work?
Hi, do not do that.
Those are paramaters used in multiple places and you replaced them with constants…
There should be a z height value or something similar.
Lukas I forgot to comment that my printer is a kossel delta pulley, I don’t know if it influences something
Hi, you need to select the non plus version in the FW + set height if necessarry.
Hello, I get probing failure, it does the upper leveling and when the probe goes down it does not touch the bed, it stays at a few millimeters as if the maximum height was not correct and thus avoid breaking components.
you maybe have the wrong probe configured
sheldon: No se si te sirva esta informacion, pero alguna vez tuve este problema que mencionas, lo que hice al tener instalado el IDE de Arduino (1.8.5) y actualizado el driver junto con la identificación del puerto correspondiente (En ese entonces le asigne del 15 al 3 ya que era el mas proximo al 1 y era el unico que se encontraba libre), de allí lo que hice fue actualizar todas las librerías que se usaban (de la ventana programa/incluir libreria/gestionar librerias/tipo/actualizable), reinicie el IDE y listo; todo fue como magico, mis problemas se solucionaron… espero te sirva
Thank you!
I am adding an english translation (google translator)
I don’t know if this information is useful to you, but I once had this problem that you mention, which I did when I had the Arduino IDE installed (1.8.5) and updated the driver along with the identification of the corresponding port (At that time you assign from 15 to 3 as it was the closest to 1 and was the only one that was free), from there what I did was update all the libraries that were used (from the program window / include library / manage libraries / type / upgradeable), restart the IDE and you’re done; everything was like magic, my problems were solved… I hope it helps you
Hi Lukas,
First of all thanks for the wonderful work and for your sharing.
I wanted to submit a problem that I can not solve, I tried to install version 2.0.0 on my Anycubic Kossel Linear Plusseguenpo your beautiful post.
I set the necessary parameters as you indicated:
probe type 2 (mine is n.c.)
hotbed type 1 (aluminum with sticker)
print radius 115.0.
I did the test with the other standard parameters, no problems in compiling and loading but when I started the self leveling something went wrong.
the probe has correctly tested the central points and then passes to the first external point, everything is ok for the first two points but at the third the head has looked for a point outside the bed and crashes.
I repeated several times with the same result.
the strange thing is that with version 1.1.9 everything works perfectly.
Do you have any suggestions about it.
Hi, double check your calibration radius.
And erase/restart EEPPROM.
Hi Lukas, Thank you greatly for putting together this version of Marlin for the Anycubic Kossel. I have all the modifications I needed done to the firmware compiled and successfully uploaded to my printer, however I have one issue. Anytime the printer is on, the bed auto heats up to between 70-100C. This is very not ideal for me so do you know why this is happening and/or how to fix it? This was not an issue before I updated the firmware.
The only changes I made to your firmware version is I changed the type of bed to the “buildtak” version, lowered some max accelerations, and lowered the allowable cold extrusion temp.
Hi, why did you make that bed type change?
Thank you for responding so quickly. I believe I have the bed type specified as #1 since it is the original one that came with the printer and I had to apply a “buildtak” like sticker. When I leave it as #2 in the firmware the bed works fine, but I figured that this effects other parameters if I choose the wrong one?
Hi, to be honest…
I have only used Ultrabase definition with Marlin.
And I switched to Klipper a long time ago…
I think that the difference is in P, I, D values, but you can recalibrate it.
hello I got this firmware to upload once with my basic settings but when I keep trying to go back in and edit it because my prints are not dimensionally accurate the sketch wont compile. I’ve tried so many different versions of Arduino and still nothing. I’m very frustrated was just trying to update my printer and now its a paper weight.
Ive been struggling with this for weeks being I really like your firmware but I just cant seem to get it to work.
Arduino: 1.8.13 (Windows Store 1.8.42.0) (Windows 10), Board: “Arduino Mega or Mega 2560, ATmega2560 (Mega 2560)”
C:\Users\sheld\AppData\Local\Temp\ccjjCQ3b.ltrans0.ltrans.o: In function `main’:
C:\Program Files\WindowsApps\ArduinoLLC.ArduinoIDE_1.8.42.0_x86__mdqgnx93n4wtt\hardware\arduino\avr\cores\arduino/main.cpp:43: undefined reference to `setup’
C:\Program Files\WindowsApps\ArduinoLLC.ArduinoIDE_1.8.42.0_x86__mdqgnx93n4wtt\hardware\arduino\avr\cores\arduino/main.cpp:46: undefined reference to `loop’
collect2.exe: error: ld returned 1 exit status
exit status 1
Error compiling for board Arduino Mega or Mega 2560.
This report would have more information with
“Show verbose output during compilation”
option enabled in File -> Preferences.
Hi, it looks like you have made some mistake in the code.
Try to download it and compile it again.
See I tried that again downloading it fresh and only imputing the basic parameters such as diagonal rod info and the like. It will not compile. I really do not understand what’s going on here. Im using the same version of Arduino as you as well the 1.8.10. Ive also tried it on two other systems with the same result.
So I just went through fresh and clean again fresh files and every thing. It compiled on its own I changed just a few variables and it compiled again but then I tried to upload and got an error.
These are the settings I changed and that it.
#if ENABLED(ANYCUBIC_KOSSEL_PLUS)
// Print surface diameter/2 minus unreachable space (avoid collisions with vertical towers).
#define DELTA_PRINTABLE_RADIUS 120.0 // (mm)
// Center-to-center distance of the holes in the diagonal push rods.
#define DELTA_DIAGONAL_ROD 267.0 // (mm)
// Horizontal offset from middle of printer to smooth rod center.
#define DELTA_SMOOTH_ROD_OFFSET 163.0 // (mm)
// Horizontal offset of the universal joints on the end effector.
#define DELTA_EFFECTOR_OFFSET 31.0 // (mm)
// Horizontal offset of the universal joints on the carriages.
#define DELTA_CARRIAGE_OFFSET 20.6 // (mm)
// Horizontal distance bridged by diagonal push rods when effector is centered.
#define DELTA_RADIUS (DELTA_SMOOTH_ROD_OFFSET-(DELTA_EFFECTOR_OFFSET)-(DELTA_CARRIAGE_OFFSET)) // (mm) Get this value from G33 auto calibrate
#else
// Print surface diameter/2 minus unreachable space (avoid collisions with vertical towers).
#define DELTA_PRINTABLE_RADIUS 90.0 // (mm)
// Center-to-center distance of the holes in the diagonal push rods.
#define DELTA_DIAGONAL_ROD 218.0 // (mm)
// Horizontal distance bridged by diagonal push rods when effector is centered.
#define DELTA_RADIUS 97.0 // (mm) Get this value from G33 auto calibrate
#endif
// Distance between bed and nozzle Z home position
#define DELTA_HEIGHT 280.40 // (mm) Get this value from G33 auto calibrate
This is the error code im getting not allowing me to upload to printer. With these changes I was only able to verify the sketch but when I tried to upload got this error.
Arduino: 1.8.15 (Windows Store 1.8.49.0) (Windows 10), Board: “Arduino/Genuino Mega or Mega 2560, ATmega2560 (Mega 2560)”
Sketch uses 181006 bytes (71%) of program storage space. Maximum is 253952 bytes.
Global variables use 5159 bytes (62%) of dynamic memory, leaving 3033 bytes for local variables. Maximum is 8192 bytes.
avrdude: ser_open(): can’t open device “\\.\COM3”: The system cannot find the file specified.
avrdude: ser_drain(): read error: The handle is invalid.
avrdude: ser_send(): write error: sorry no info avail
avrdude: stk500_send(): failed to send command to serial port
avrdude: ser_recv(): read error: The handle is invalid.
avrdude: stk500v2_ReceiveMessage(): timeout
avrdude: ser_send(): write error: sorry no info avail
avrdude: stk500_send(): failed to send command to serial port
avrdude: ser_recv(): read error: The handle is invalid.
avrdude: ser_recv(): read error: The handle is invalid.
avrdude: stk500v2_ReceiveMessage(): timeout
avrdude: ser_send(): write error: sorry no info avail
avrdude: stk500_send(): failed to send command to serial port
avrdude: ser_recv(): read error: The handle is invalid.
avrdude: stk500v2_ReceiveMessage(): timeout
avrdude: ser_send(): write error: sorry no info avail
avrdude: stk500_send(): failed to send command to serial port
avrdude: ser_recv(): read error: The handle is invalid.
avrdude: stk500v2_ReceiveMessage(): timeout
avrdude: ser_send(): write error: sorry no info avail
avrdude: stk500_send(): failed to send command to serial port
avrdude: ser_recv(): read error: The handle is invalid.
avrdude: stk500v2_ReceiveMessage(): timeout
avrdude: ser_send(): write error: sorry no info avail
avrdude: stk500_send(): failed to send command to serial port
avrdude: ser_recv(): read error: The handle is invalid.
avrdude: stk500v2_ReceiveMessage(): timeout
avrdude: stk500v2_getsync(): timeout communicating with programmer
This report would have more information with
“Show verbose output during compilation”
option enabled in File -> Preferences.
Almost there (hopefully :D).
This says it is unable to connect to board.
Common problems:
Cura or another slicer application running at the same time
Incorrect COM port
Another device using that COM port
So I’m not sure why its having issues I have no other apps open I’ve also tried every usb port i have with the same results. should I uninstall the com port driver to have it reset? or could it possibly be an issue with board? my computer sounds when I plug the printer in so its recognizing it. what other possible issues could cause this? bad cord? maybe Usb or dc jumper not correct? any ideas?
looks like same error
Arduino: 1.8.15 (Windows Store 1.8.49.0) (Windows 10), Board: “Arduino/Genuino Mega or Mega 2560, ATmega2560 (Mega 2560)”
Sketch uses 181006 bytes (71%) of program storage space. Maximum is 253952 bytes.
Global variables use 5159 bytes (62%) of dynamic memory, leaving 3033 bytes for local variables. Maximum is 8192 bytes.
avrdude: ser_open(): can’t open device “\\.\COM3”: The system cannot find the file specified.
avrdude: ser_drain(): read error: The handle is invalid.
avrdude: ser_send(): write error: sorry no info avail
avrdude: stk500_send(): failed to send command to serial port
avrdude: ser_recv(): read error: The handle is invalid.
avrdude: stk500v2_ReceiveMessage(): timeout
avrdude: ser_send(): write error: sorry no info avail
avrdude: stk500_send(): failed to send command to serial port
avrdude: ser_recv(): read error: The handle is invalid.
the selected serial port
does not exist or your board is not connected
avrdude: stk500v2_ReceiveMessage(): timeout
avrdude: ser_send(): write error: sorry no info avail
avrdude: stk500_send(): failed to send command to serial port
avrdude: ser_recv(): read error: The handle is invalid.
avrdude: stk500v2_ReceiveMessage(): timeout
avrdude: ser_send(): write error: sorry no info avail
avrdude: stk500_send(): failed to send command to serial port
avrdude: ser_recv(): read error: The handle is invalid.
avrdude: stk500v2_ReceiveMessage(): timeout
avrdude: ser_send(): write error: sorry no info avail
avrdude: stk500_send(): failed to send command to serial port
avrdude: ser_recv(): read error: The handle is invalid.
avrdude: stk500v2_ReceiveMessage(): timeout
avrdude: ser_send(): write error: sorry no info avail
avrdude: stk500_send(): failed to send command to serial port
avrdude: ser_recv(): read error: The handle is invalid.
avrdude: stk500v2_ReceiveMessage(): timeout
avrdude: stk500v2_getsync(): timeout communicating with programmer
This report would have more information with
“Show verbose output during compilation”
option enabled in File -> Preferences.
So I’ve tried different cords also switching usb jumper and also tried it on a second trigorilla board I have that’s brand new and still having same issue.
Are you really sure that it is a COM3?
Arduino is saying to use com 4 but every time I plug it in or out it only shows up as com4 not sure how to switch it to com3 being I can plug it into any of my usb ports and its still labeled as com4 in device manager. Im going to be happy to donate if we can get this fixed my printer has been down for so long. i do really love your firmware god just wish I could fix this thing.
still nothing im getting a new error code. I’m so frustrated in all my years of 3d printing I’ve never had so many issues uploading firmware i do not understand whats happening here. Could really use the help.
Error code
Arduino: 1.8.15 (Windows Store 1.8.49.0) (Windows 10), Board: “Arduino/Genuino Mega or Mega 2560, ATmega2560 (Mega 2560)”
C:\Users\sheld\AppData\Local\Temp\cceUvVDl.ltrans0.ltrans.o: In function `main’:
C:\Users\sheld\Documents\ArduinoData\packages\arduino\hardware\avr\1.8.1\cores\arduino/main.cpp:43: undefined reference to `setup’
C:\Users\sheld\Documents\ArduinoData\packages\arduino\hardware\avr\1.8.1\cores\arduino/main.cpp:46: undefined reference to `loop’
collect2.exe: error: ld returned 1 exit status
exit status 1
Error compiling for board Arduino/Genuino Mega or Mega 2560.
This report would have more information with
“Show verbose output during compilation”
option enabled in File -> Preferences.
Hm…
It is possible that your Arduino IDE is the issue.
Uninstall it and install a version from official web, not from Windows Store.
I have never been able to upload FW via Arduido IDE from Windows Store.
This is from your error message:
Arduino: 1.8.15 (Windows Store 1.8.49.0) (Windows 10),
Hello Lukáš,
I tried to update my kossel to new firmware Merlin 2.0. I used Arduino but after kompilation checking it writes me this error. Please could you help me.
Thanks a lot
C:\Users\zzapa\AppData\Local\Temp\ccGGLup5.ltrans0.ltrans.o: In function `main’:
C:\Users\zzapa\AppData\Local\Arduino15\packages\arduino\hardware\avr\1.8.1\cores\arduino/main.cpp:43: undefined reference to `setup’
C:\Users\zzapa\AppData\Local\Arduino15\packages\arduino\hardware\avr\1.8.1\cores\arduino/main.cpp:46: undefined reference to `loop’
collect2.exe: error: ld returned 1 exit status
exit status 1
Nastala chyba při kompilaci u desky Arduino/Genuino Mega or Mega 2560.
Hi, you have probably some typo in your code.
The easiest way is to start over.
Hi, I am not really sure about this error, could be some communication problem (standard problem is running IDE and Cura at the same time), or it could be some problem in the code.
Hi, im trying to instal your firmware however when i verify it i get this error:
In file included from sketch\src\module/stepper/indirection.h:44:0,
from sketch\src\module/stepper.h:47,
from sketch\src\Marlin.cpp:37:
sketch\src\module/stepper/trinamic.h:29:10: fatal error: TMCStepper.h: No such file or directory
#include
Any help would be greatly appreciated.
Hi, did you sort it out?
I ran into your website after my Anycubic Kossel Linear Plus turned itself into a hotend-crashing paperweight. After doing the Marlin install and all your tweaks I have it printing ABS without an enclosure right now. I sent you a donation. Cheers! Now I have to find a Marlin port for my Geeetech so I can add PID tuning. So far I can’t because of a missing driver for the touchscreen display.
First post had a mistake in the email address.
I ran into your website after my Anycubic Kossel Linear Plus turned itself into a hotend-crashing paperweight. After doing the Marlin install and all your tweaks I have it printing ABS without an enclosure right now. I sent you a donation. Cheers! Now I have to find a Marlin port for my Geeetech so I can add PID tuning. So far I can’t because of a missing driver for the touchscreen display.
Thank you!
I am always glad to hear good news and that this website did help someone 🙂
Thank you!
I am always glad to hear good news and that this website did help someone 🙂
Hello,
I got Marlin loaded and it will calibrate great, but when I try to preheat or to print, it won’t get to temperature before it says the following.
HEATING FAILED: E1
Never happened before I did the marlin upgrade. I’m thinking that the heat up cycle is timing out before it reaches temperature, but I don’t know how to adjust the amount of time before it kills the print. Any help would be greatly appreciated.
Did you PID tune hot end?
Hi. I am trying to update the firmware on my kossel linear plus to the Marlim firmware, but I keep getting an error message. I would greatly appreciate any help or advice you can offer.
avrdude: stk500v2_ReceiveMessage ( ) : timeout
avrdude: stk500v2_getsync ( ) : timeout communicating with programmer
V/R
Ryan
Hi,
90% incorrect COM port selected in IDE or incorrect board type.
I actually figured it out. I followed this link and it worked.
https://www.reddit.com/r/3Dprinting/comments/7e55g0/anycubic_kossel_trigorilla_controlboard_avrdude/
Hi Lukas, I followed all the steps but when I attempt to upload (or even verify) I get the following error message (after pressing copy error message):
Arduino: 1.8.13 (Mac OS X), Board: “Arduino Mega or Mega 2560, ATmega2560 (Mega 2560)”
/Users/user1/Desktop/Arduino.app/Contents/Java/arduino-builder -dump-prefs -logger=machine -hardware /Users/user1/Desktop/Arduino.app/Contents/Java/hardware -tools /Users/user1/Desktop/Arduino.app/Contents/Java/tools-builder -tools /Users/user1/Desktop/Arduino.app/Contents/Java/hardware/tools/avr -built-in-libraries /Users/user1/Desktop/Arduino.app/Contents/Java/libraries -libraries /Users/user1/Documents/Arduino/libraries -fqbn=arduino:avr:mega:cpu=atmega2560 -vid-pid=10C4_EA60 -ide-version=10813 -build-path /var/folders/y9/fk9_n3rj1sd7_f3sd6xv7h9c0000gn/T/arduino_build_115246 -warnings=none -build-cache /var/folders/y9/fk9_n3rj1sd7_f3sd6xv7h9c0000gn/T/arduino_cache_650711 -prefs=build.warn_data_percentage=75 -prefs=runtime.tools.avrdude.path=/Users/user1/Desktop/Arduino.app/Contents/Java/hardware/tools/avr -prefs=runtime.tools.avrdude-6.3.0-arduino17.path=/Users/user1/Desktop/Arduino.app/Contents/Java/hardware/tools/avr -prefs=runtime.tools.avr-gcc.path=/Users/user1/Desktop/Arduino.app/Contents/Java/hardware/tools/avr -prefs=runtime.tools.avr-gcc-7.3.0-atmel3.6.1-arduino7.path=/Users/user1/Desktop/Arduino.app/Contents/Java/hardware/tools/avr -prefs=runtime.tools.arduinoOTA.path=/Users/user1/Desktop/Arduino.app/Contents/Java/hardware/tools/avr -prefs=runtime.tools.arduinoOTA-1.3.0.path=/Users/user1/Desktop/Arduino.app/Contents/Java/hardware/tools/avr -verbose /Users/user1/Desktop/SETUP FILES/Marlin 2.0/Kossel-Marlin-2-0-0-LPomykal/Marlin/Marlin.ino
/Users/user1/Desktop/Arduino.app/Contents/Java/arduino-builder -compile -logger=machine -hardware /Users/user1/Desktop/Arduino.app/Contents/Java/hardware -tools /Users/user1/Desktop/Arduino.app/Contents/Java/tools-builder -tools /Users/user1/Desktop/Arduino.app/Contents/Java/hardware/tools/avr -built-in-libraries /Users/user1/Desktop/Arduino.app/Contents/Java/libraries -libraries /Users/user1/Documents/Arduino/libraries -fqbn=arduino:avr:mega:cpu=atmega2560 -vid-pid=10C4_EA60 -ide-version=10813 -build-path /var/folders/y9/fk9_n3rj1sd7_f3sd6xv7h9c0000gn/T/arduino_build_115246 -warnings=none -build-cache /var/folders/y9/fk9_n3rj1sd7_f3sd6xv7h9c0000gn/T/arduino_cache_650711 -prefs=build.warn_data_percentage=75 -prefs=runtime.tools.avrdude.path=/Users/user1/Desktop/Arduino.app/Contents/Java/hardware/tools/avr -prefs=runtime.tools.avrdude-6.3.0-arduino17.path=/Users/user1/Desktop/Arduino.app/Contents/Java/hardware/tools/avr -prefs=runtime.tools.avr-gcc.path=/Users/user1/Desktop/Arduino.app/Contents/Java/hardware/tools/avr -prefs=runtime.tools.avr-gcc-7.3.0-atmel3.6.1-arduino7.path=/Users/user1/Desktop/Arduino.app/Contents/Java/hardware/tools/avr -prefs=runtime.tools.arduinoOTA.path=/Users/user1/Desktop/Arduino.app/Contents/Java/hardware/tools/avr -prefs=runtime.tools.arduinoOTA-1.3.0.path=/Users/user1/Desktop/Arduino.app/Contents/Java/hardware/tools/avr -verbose /Users/user1/Desktop/SETUP FILES/Marlin 2.0/Kossel-Marlin-2-0-0-LPomykal/Marlin/Marlin.ino
Using board ‘mega’ from platform in folder: /Users/user1/Desktop/Arduino.app/Contents/Java/hardware/arduino/avr
Using core ‘arduino’ from platform in folder: /Users/user1/Desktop/Arduino.app/Contents/Java/hardware/arduino/avr
Detecting libraries used…
/Users/user1/Desktop/Arduino.app/Contents/Java/hardware/tools/avr/bin/avr-g++ -c -g -Os -w -std=gnu++11 -fpermissive -fno-exceptions -ffunction-sections -fdata-sections -fno-threadsafe-statics -Wno-error=narrowing -flto -w -x c++ -E -CC -mmcu=atmega2560 -DF_CPU=16000000L -DARDUINO=10813 -DARDUINO_AVR_MEGA2560 -DARDUINO_ARCH_AVR -I/Users/user1/Desktop/Arduino.app/Contents/Java/hardware/arduino/avr/cores/arduino -I/Users/user1/Desktop/Arduino.app/Contents/Java/hardware/arduino/avr/variants/mega /var/folders/y9/fk9_n3rj1sd7_f3sd6xv7h9c0000gn/T/arduino_build_115246/sketch/Marlin.ino.cpp -o /dev/null -DARDUINO_LIB_DISCOVERY_PHASE
Generating function prototypes…
/Users/user1/Desktop/Arduino.app/Contents/Java/hardware/tools/avr/bin/avr-g++ -c -g -Os -w -std=gnu++11 -fpermissive -fno-exceptions -ffunction-sections -fdata-sections -fno-threadsafe-statics -Wno-error=narrowing -flto -w -x c++ -E -CC -mmcu=atmega2560 -DF_CPU=16000000L -DARDUINO=10813 -DARDUINO_AVR_MEGA2560 -DARDUINO_ARCH_AVR -I/Users/user1/Desktop/Arduino.app/Contents/Java/hardware/arduino/avr/cores/arduino -I/Users/user1/Desktop/Arduino.app/Contents/Java/hardware/arduino/avr/variants/mega /var/folders/y9/fk9_n3rj1sd7_f3sd6xv7h9c0000gn/T/arduino_build_115246/sketch/Marlin.ino.cpp -o /var/folders/y9/fk9_n3rj1sd7_f3sd6xv7h9c0000gn/T/arduino_build_115246/preproc/ctags_target_for_gcc_minus_e.cpp -DARDUINO_LIB_DISCOVERY_PHASE
/Users/user1/Desktop/Arduino.app/Contents/Java/tools-builder/ctags/5.8-arduino11/ctags -u –language-force=c++ -f – –c++-kinds=svpf –fields=KSTtzns –line-directives /var/folders/y9/fk9_n3rj1sd7_f3sd6xv7h9c0000gn/T/arduino_build_115246/preproc/ctags_target_for_gcc_minus_e.cpp
Compiling sketch…
/Users/user1/Desktop/Arduino.app/Contents/Java/hardware/tools/avr/bin/avr-g++ -c -g -Os -w -std=gnu++11 -fpermissive -fno-exceptions -ffunction-sections -fdata-sections -fno-threadsafe-statics -Wno-error=narrowing -MMD -flto -mmcu=atmega2560 -DF_CPU=16000000L -DARDUINO=10813 -DARDUINO_AVR_MEGA2560 -DARDUINO_ARCH_AVR -I/Users/user1/Desktop/Arduino.app/Contents/Java/hardware/arduino/avr/cores/arduino -I/Users/user1/Desktop/Arduino.app/Contents/Java/hardware/arduino/avr/variants/mega /var/folders/y9/fk9_n3rj1sd7_f3sd6xv7h9c0000gn/T/arduino_build_115246/sketch/Marlin.ino.cpp -o /var/folders/y9/fk9_n3rj1sd7_f3sd6xv7h9c0000gn/T/arduino_build_115246/sketch/Marlin.ino.cpp.o
Compiling libraries…
Compiling core…
Using previously compiled file: /var/folders/y9/fk9_n3rj1sd7_f3sd6xv7h9c0000gn/T/arduino_build_115246/core/wiring_pulse.S.o
Using previously compiled file: /var/folders/y9/fk9_n3rj1sd7_f3sd6xv7h9c0000gn/T/arduino_build_115246/core/WInterrupts.c.o
Using previously compiled file: /var/folders/y9/fk9_n3rj1sd7_f3sd6xv7h9c0000gn/T/arduino_build_115246/core/hooks.c.o
Using previously compiled file: /var/folders/y9/fk9_n3rj1sd7_f3sd6xv7h9c0000gn/T/arduino_build_115246/core/wiring.c.o
Using previously compiled file: /var/folders/y9/fk9_n3rj1sd7_f3sd6xv7h9c0000gn/T/arduino_build_115246/core/wiring_analog.c.o
Using previously compiled file: /var/folders/y9/fk9_n3rj1sd7_f3sd6xv7h9c0000gn/T/arduino_build_115246/core/wiring_pulse.c.o
Using previously compiled file: /var/folders/y9/fk9_n3rj1sd7_f3sd6xv7h9c0000gn/T/arduino_build_115246/core/wiring_shift.c.o
Using previously compiled file: /var/folders/y9/fk9_n3rj1sd7_f3sd6xv7h9c0000gn/T/arduino_build_115246/core/wiring_digital.c.o
Using previously compiled file: /var/folders/y9/fk9_n3rj1sd7_f3sd6xv7h9c0000gn/T/arduino_build_115246/core/CDC.cpp.o
Using previously compiled file: /var/folders/y9/fk9_n3rj1sd7_f3sd6xv7h9c0000gn/T/arduino_build_115246/core/HardwareSerial.cpp.o
Using previously compiled file: /var/folders/y9/fk9_n3rj1sd7_f3sd6xv7h9c0000gn/T/arduino_build_115246/core/HardwareSerial0.cpp.o
Using previously compiled file: /var/folders/y9/fk9_n3rj1sd7_f3sd6xv7h9c0000gn/T/arduino_build_115246/core/HardwareSerial2.cpp.o
Using previously compiled file: /var/folders/y9/fk9_n3rj1sd7_f3sd6xv7h9c0000gn/T/arduino_build_115246/core/HardwareSerial1.cpp.o
Using previously compiled file: /var/folders/y9/fk9_n3rj1sd7_f3sd6xv7h9c0000gn/T/arduino_build_115246/core/HardwareSerial3.cpp.o
Using previously compiled file: /var/folders/y9/fk9_n3rj1sd7_f3sd6xv7h9c0000gn/T/arduino_build_115246/core/IPAddress.cpp.o
Using previously compiled file: /var/folders/y9/fk9_n3rj1sd7_f3sd6xv7h9c0000gn/T/arduino_build_115246/core/PluggableUSB.cpp.o
Using previously compiled file: /var/folders/y9/fk9_n3rj1sd7_f3sd6xv7h9c0000gn/T/arduino_build_115246/core/Print.cpp.o
Using previously compiled file: /var/folders/y9/fk9_n3rj1sd7_f3sd6xv7h9c0000gn/T/arduino_build_115246/core/Stream.cpp.o
Using previously compiled file: /var/folders/y9/fk9_n3rj1sd7_f3sd6xv7h9c0000gn/T/arduino_build_115246/core/USBCore.cpp.o
Using previously compiled file: /var/folders/y9/fk9_n3rj1sd7_f3sd6xv7h9c0000gn/T/arduino_build_115246/core/WMath.cpp.o
Using previously compiled file: /var/folders/y9/fk9_n3rj1sd7_f3sd6xv7h9c0000gn/T/arduino_build_115246/core/Tone.cpp.o
Using previously compiled file: /var/folders/y9/fk9_n3rj1sd7_f3sd6xv7h9c0000gn/T/arduino_build_115246/core/WString.cpp.o
Using previously compiled file: /var/folders/y9/fk9_n3rj1sd7_f3sd6xv7h9c0000gn/T/arduino_build_115246/core/abi.cpp.o
Using previously compiled file: /var/folders/y9/fk9_n3rj1sd7_f3sd6xv7h9c0000gn/T/arduino_build_115246/core/main.cpp.o
Using previously compiled file: /var/folders/y9/fk9_n3rj1sd7_f3sd6xv7h9c0000gn/T/arduino_build_115246/core/new.cpp.o
Using previously compiled file: /var/folders/y9/fk9_n3rj1sd7_f3sd6xv7h9c0000gn/T/arduino_build_115246/core/core.a
Archiving built core (caching) in: /var/folders/y9/fk9_n3rj1sd7_f3sd6xv7h9c0000gn/T/arduino_cache_650711/core/core_arduino_avr_mega_cpu_atmega2560_f48c7a340aa696b46c2e74600946fc53.a
Linking everything together…
/Users/user1/Desktop/Arduino.app/Contents/Java/hardware/tools/avr/bin/avr-gcc -w -Os -g -flto -fuse-linker-plugin -Wl,–gc-sections -mmcu=atmega2560 -o /var/folders/y9/fk9_n3rj1sd7_f3sd6xv7h9c0000gn/T/arduino_build_115246/Marlin.ino.elf /var/folders/y9/fk9_n3rj1sd7_f3sd6xv7h9c0000gn/T/arduino_build_115246/sketch/Marlin.ino.cpp.o /var/folders/y9/fk9_n3rj1sd7_f3sd6xv7h9c0000gn/T/arduino_build_115246/core/core.a -L/var/folders/y9/fk9_n3rj1sd7_f3sd6xv7h9c0000gn/T/arduino_build_115246 -lm
/var/folders/y9/fk9_n3rj1sd7_f3sd6xv7h9c0000gn/T//cc4sh5sp.ltrans0.ltrans.o: In function `main’:
/Users/user1/Desktop/Arduino.app/Contents/Java/hardware/arduino/avr/cores/arduino/main.cpp:43: undefined reference to `setup’
/Users/user1/Desktop/Arduino.app/Contents/Java/hardware/arduino/avr/cores/arduino/main.cpp:46: undefined reference to `loop’
collect2: error: ld returned 1 exit status
exit status 1
Error compiling for board Arduino Mega or Mega 2560.
Having no experience with this I have no idea what this means! I turned on this setting in preferences as prompted; Show verbose output during: Compilation.
I have a completely stock anycubic kossel plus and I am using the cable included in the box.
Any help much appreciated, Sebastian.
Hi!
It looks like your Arduino IDE installation is missing a few things…
Try to uninstall it and download and install the newest version from the official site.
Hi again,
I actually forgot to change the jumper under the bed from DC to USB which fixed the problem.
Thanks anyway, Sebastian 🙂
Hi Lukas, how can I adapt your package to marlin 2.0.7(latest at the moment of writing)
I notice some folder structure differences
Thanks
Uccia
Hi,
I haven’t used Marlin for about one year 🙁
So I am not planning to create a newer version.
But it should not be that complicated.
You can also download examples from Marlin official page for Kossel and just compare your old configuratuon files with the examples and change what you need to.
First of all, i want to thank you for the excellent FW!!! it was very helpful to have a solid base to start with.
Secondly i have a question. i have the safe home line commented like so:
//#define DELTA_HOME_TO_SAFE_ZONE
but still the nozzle moves down after a G28!!
is there anything else i can change?
Hi,
try to reflash FW, it should help.
If not, double check your end g code, if there is anything suspicious.
Pane Lukáši mám problém. Mám aktuálně v tiskárně Marlin 2 a extruder se pokouší odjet z podložky což dopadá tak že se tvoří díry v hotbedu. Cura ani PrusaSlicer nic nezměnily ale na jiném počítači tiskárna funguje. Nevíte kde může být problém. Děkuji za pomoc.
Zdravím, nechápu výraz “extruder se pokouší odjet z podložky”
A jak tiskárna na jiném PC funguje?
Takže tipuji tisk přes USB (který se těžce nedoporučuje, doporučuje se tisk přes kartu).
Hi Lukas
For the Anycubic Predator With skr pro 1.1 it is similar fonctions in marlin ?
Hi, what do you mean by similar functions?
Thank you lukas.
Got my printer last week with stock fw my god it was terrible.
Thank god I found this guide its detailed and helped a lot getting things set up.
Printer now works a treat just need to tune my cura settings
Hi, thank you!
ciao io ho installato tutto perfettamente la stampante è andata bene 2 giorni, adesso mi viene fuori errore: THERMAL RUNAWAY : E1 PRINTER HOLTED please reset
da quello che ho capito fa partire estrusore 2 che io non ho e va in crash cosa devo fare ? grazie mille in anticipo
Use English please and foloow the guide step by step.
There is a PID calibration at the of of this guide which you probably did not do.
https://www.lpomykal.cz/3d-printers/kossel/anycubic-kossel-marlin-guide/
Also there I have thermal runaway guide, it is in the menu od the right, at the top.
https://www.lpomykal.cz/3d-printers/kossel/anycubic-kossel-thermal-runaway/
Hello Lukas,
I’ve got the kossel linear and updated to your Marlin 2.0 my bed is 200mm, aluminum heatbed with glass bed and my probe is V 2. What do I have to change in config.h? After the upgrade it won’t do auto calibration. Please any advice.
Zdravím Lukáši,
snažím se nahrát do svojí tiskárny Marlin 2.0, ale nedaří se mi vůbec.
Mám trigorilla 1.1 desku ( nechápu proč teď jsem tiskárnu kupoval novou).
K tomu jsem dokoupil TMC2208 v3.0 drivery. Dodělal jsem si přisvícení a vyztužil jsem rám plus tisknu na zrcadlo.
k problému:
Snažím se nahrát Marlin 2.0 podle návodu výše a pokaždé když to chci zkompilovat a poslat vychrlí to na mě hlášku: #error “Oops! Select ‘Arduino/Genuino Mega or Mega 2560’ in ‘Tools > Board.'”
Zkoušel jsem se dívat i do záložky Boards.h a tam našel tu verzi desky co máte Vy a zadal jí ručně znovu. -> pořád stejné. Drivery jsou tam teď úplně nově a změnil jsem je i v kódu, ale bohužel nic nemůžu nahrát.
díky za radu
Jakub
Čau,
Přečti si znovu bod 5 hned pod nadpisem a bude ti to jasné.
V Arduino IDE musíš vybrat správnou desku a procesor, na který to budeš nahrávat.
Ahoj,
tento krok se mi povedl, ale nastala další nepředpokládaná chyba.
C:\Users\Jakub\AppData\Local\Temp\ccBZV1Iq.ltrans0.ltrans.o: In function `Buzzer::tick()’:
:(.text+0x14dc): undefined reference to `tone(unsigned char, unsigned int, unsigned long)’
C:\Users\Jakub\AppData\Local\Temp\ccBZV1Iq.ltrans1.ltrans.o:(.rodata+0x13): undefined reference to `Print::write(unsigned char const*, unsigned int)’
c:/program files (x86)/arduino/hardware/tools/avr/bin/../lib/gcc/avr/7.3.0/../../../../avr/lib/avr6/crtatmega2560.o:(.init9+0x0): undefined reference to `main’
collect2.exe: error: ld returned 1 exit status
exit status 1
Nastala chyba při kompilaci u desky Arduino Mega or Mega 2560.
nevím co to úplně znamená v těchhle oblastech jsem nováček 🙂
s pozdravem
Jakub
Ahoj,
Díky za odpověď, změnil jsem to a narazil jsem na další problém 🙁
v téhle oblasti sw jsem začátečník tak mě prosím ber s rezervou 🙂
vyhodilo to na mě tuhle hlášku:
C:\Users\Jakub\AppData\Local\Temp\ccBZV1Iq.ltrans0.ltrans.o: In function `Buzzer::tick()’:
:(.text+0x14dc): undefined reference to `tone(unsigned char, unsigned int, unsigned long)’
C:\Users\Jakub\AppData\Local\Temp\ccBZV1Iq.ltrans1.ltrans.o:(.rodata+0x13): undefined reference to `Print::write(unsigned char const*, unsigned int)’
c:/program files (x86)/arduino/hardware/tools/avr/bin/../lib/gcc/avr/7.3.0/../../../../avr/lib/avr6/crtatmega2560.o:(.init9+0x0): undefined reference to `main’
collect2.exe: error: ld returned 1 exit status
exit status 1
Nastala chyba při kompilaci u desky Arduino Mega or Mega 2560.
jestli víš co s tíhmle budu strašně šťastnej když se podělíš
díky
Jakub
Netuším, co jsi s tím Marlin dělal, ale doporučuji ti, stáhnout ho znovu a nedělat nic víc, než je nutné.
Thank you… after three days of fighting with the delta printer, in the end you helped me see the light … good work…
Thank you.
Would you add anything to this guide?
Some another steps?
Can you give me your firmware for reference? I couldn’t configure it.
My printer: Anycubic kossel linear plus, probe version 2, bed version 1,
thanks
Hi, you can download it via buttons on the top of this page:
http://www.lpomykal.cz/download/kossel/Kossel-Marlin-2-0-0-LPomykal.zip
This configuration file you have configured for the printer Anycubic kossel linear plus, just download and use it? do you need any more correction? thank you
My personal advice is:
Download and, check all steps one by one and modify anything you need to.
I used it for Anycubic Kossel Linear Plus, Probe 2, Ultrabase.
Well thank you for your advice very much! let me ask a question that in your zip file I see no other libraries like board.h, stepper.h .v.v.
Just follow the guide step by step, they are there.
Everything for me has been working extremely well except for the one issue I’m encountering right now.
example case printing calibration cube
leveling is good and print goes well, however, at about 95% completion the printer doesn’t fill in the entire Z and instead trails off the print completely with the last bit of filament extruded on the side of the build plate.
example 2 printing small figurine.
once again everything seems to be going perfectly fine but at about 40% completion the printer decides to start printing about 0.5inch higher than the rest of the print.
Am I missing something? Is there a chance this isn’t firmware related?
Do you have a picture?
Heres a picture of the calibration cube : https://imgur.com/a/dujg1YK
the print head was on the build plate a little to the left with a line of filament attached.
I truly appreciate the help.
Thanks saved my mask production for NHS cheers mate 🙂
You are welcome.
Disaster! After printing fine I cannot auto calibrate. I have reinstalled many version of marlin 2 and nothing works. Printer starts auto calibrating, then stops half way to the bed, start gonung uo in increments (says checking AC) goes sideways and says Probing failed! I have tried resetting through meny and through pronteface. At some point pronterface says my eeprom is different version than firmware. I think it all started when I selected initialise eeprom at some point after something I read online. I am really frystrated working for 2 days on this.I was printing rc3 face masks for covid19 for a voluntary group and now I cannot Please help
Try to restore/restart EEPPROM
Hi , I have installed Marlin on my Kossel Plus and it works great. Is there any guide for the menu? How to adjust Z offset after auto calibration? I used tune after I started the print and I managed to adjust the issue. Is there another way in the menu?Thank you
Hi, there is baby stepping for that.
But I have another guide for Delta calibration:
http://www.lpomykal.cz/3d-printers/kossel/kossel-bed-calibration-marlin-fw/
Dobrý den Lukáši,
jsme úplní začátečníci v 3D tisku. Máme novou 3D tiskárnu Anycubic Kossel Plus. Po sestavení se nám zapne, uvítá nás, display naběhne do info stavu. Při vložení dodané karty, se karta načte a lze procházet. V menu dáme Print from SD, zde lze procházet strukturu adresářů, ale nejde (a nebo neumíme) zvolit stl soubor – vůbec nejsou vidět, přestože při procházení na počítači na dodané kartě nějaké testovací a ukázkové jsou. Jiné karty Adata SDHC 4GB, Kingstone 8GB, formát FAT32 s obsahem jen dvou stl souboru se v tiskárně vůbec nenačtou.
Při použití dodávaného SW Cura 15.04.6 (nastaveno dle manuálu na Windows 10 ver. 1909) se po odeslání modelu na tisk stane to, že se tiskárna zřejmě restartuje. Display na ní na okamžik zhasne, problikne ANYCUBIC PLUS Welcome a zobrazí se základní info screen. A SW nahlásí chybu spojení.
Prosím nesetkal jste se s podobných chováním? Vyřešil by i toto chování nový firmware? Můžeme ho přepsat, i když je tiskárna v záruce?
Děkuji a přeji hezké Velikonoce.
Dan
Tiskárna neumí číst stl soubory, je potřeba používat gcode soubor, který generuje slicer (Cura například).
Nový FW klidně můžete zkusit použít.
Hi Lukas, awesome guide tanks!
I tried to load the firmware but I report a “probing failed” when I try to make Delta Calibration on my printer… I don’t knows what’s wrong… These was what PC receiving when G33 starts:
21:11:19.346 : N20 G28*33
21:11:24.408 : X:0.00 Y:0.00 Z:326.07 E:0.00 Count A:44725 B:44725 C:44725
21:11:34.858 : G33 Auto Calibrate
21:11:34.861 : Checking… AC
21:11:34.863 : .Height:310.00 Ex:+0.00 Ey:+0.00 Ez:+0.00 Radius:132.44
21:11:34.865 : . Tx:+0.00 Ty:+0.00 Tz:+0.00
21:11:41.355 : Deploy Z-Probe
21:11:59.767 : Iteration : 01 std dev:293.474
21:12:04.116 : Stow Z-Probe
21:12:07.421 : Error:Probing Failed
21:12:07.423 : Correct delta settings with M665 and M666
Hi,
Did you check your probe type?
Check your wiring and connectors also.
Also did you click the button to deploy Z probe?
Hi thanks for this guide.
But I found one problem marlin 2.0 when is printing finished printing head start going up and collisioning with linear plus X. Can you help me with this problem?
https://github.com/asdmin/kossel-faq/blob/master/crash-into-x-tower.md?fbclid=IwAR3odz-Z3u9EuHgwQhgVYX0urnCp37UD8yEwzF2O_4RfbE1iE6iLoGViVgg
Lukas,
I have not been able to get online for a while but i wanted to thank you for all your help in previous posts i was never able to get the new magnetic rods to auto calibrate so i went back to stock rods thank you so much for your help though and good health to you!
Thank you!
You saved my printer! Thank you, man!
You are welcome!
I am happy to help.
I was thinking of selling Kossel as the 1.1.8 version of the autocalibration issue.
However, I updated to version 2.0 and the problem disappeared neatly.
Thank you very much
I am glad to hear it.
Kossel LP is an awesome printer for that price tag.
Thank you very much for the detailed instructions !!!
You are welcome 🙂
Klipper guide will follow.
First thanks for sharing the right up it has been extremely beneficial.
It is very clear and was able to get my anycubic linear plus up and printing again with stock rods . I have a question though I have a set of magnet rods and when I switch them out and adjust the values the auto calibration wants to crash into the tower after the first few center points I have measured multiple times and the rods are from blueagle they came with exact measurements do you know what might cause this?
What values did you modify?
Did you print new effector?
i utilized https://www.thingiverse.com/thing:2470129 and had the the effector adapter and carriage mounts printed professionally in nylon i am using blue eagle rods at 288.13 mm all came labeled and when i checked they are exactly 288.13 here is what is in my config h
#if ENABLED(ANYCUBIC_KOSSEL_PLUS)
// Print surface diameter/2 minus unreachable space (avoid collisions with vertical towers).
#define DELTA_PRINTABLE_RADIUS 120.0 // (mm)
// Center-to-center distance of the holes in the diagonal push rods.
#define DELTA_DIAGONAL_ROD 288.13 // (mm)
// Horizontal offset from middle of printer to smooth rod center.
#define DELTA_SMOOTH_ROD_OFFSET 186.0 // (mm)
// Horizontal offset of the universal joints on the end effector.
#define DELTA_EFFECTOR_OFFSET 31.0 // (mm)
// Horizontal offset of the universal joints on the carriages.
#define DELTA_CARRIAGE_OFFSET 20.6 // (mm)
// Horizontal distance bridged by diagonal push rods when effector is centered.
#define DELTA_RADIUS (DELTA_SMOOTH_ROD_OFFSET-(DELTA_EFFECTOR_OFFSET)-(DELTA_CARRIAGE_OFFSET)) // (mm) Get this value from G33 auto calibrate
#else
// Print surface diameter/2 minus unreachable space (avoid collisions with vertical towers).
#define DELTA_PRINTABLE_RADIUS 120.0 // (mm)
// Center-to-center distance of the holes in the diagonal push rods.
#define DELTA_DIAGONAL_ROD 288.13 // (mm)
// Horizontal distance bridged by diagonal push rods when effector is centered.
#define DELTA_RADIUS 97.0 // (mm) Get this value from G33 auto calibrate
#endif
I have also tried adjusting both of these up and down to see if it effects the crash with out any change
// Horizontal offset of the universal joints on the end effector.
#define DELTA_EFFECTOR_OFFSET 31.0 // (mm) tried upto 37.0
// Horizontal offset of the universal joints on the carriages.
#define DELTA_CARRIAGE_OFFSET 20.6 // (mm) tried upto 28.0
What bed diameter do you have?
240mm glass
Check this picture, measure values on your printer and modify Marlin:
https://kandepet.com/wp-content/uploads/2017/03/delta-offsets.png
Awesome Guide. I’m having an issue when the probe is lowering for the auto-calibration is stops about 1 inch from the bed, never touching, and then gives a probing failed error. what do you think could be causing this? Thanks!
Thank you!
Check your probe type and connection.
Usually the problem is in the wiring.
Hi there!
Thank you very much for this (and the other) great guide(s)! Keep up the excellent work! Maybe you could write something about PETG & retraction & the Kossel. I wasted hours in the Cura options to find a ideal solution for supports and the right retraction with PETG.
Thank you!
What rectration setting do you use now?
Hi,
thank you for your reply. I am using 60 mm/s at 3mm for retraction. It is still not perfect. I have still trouble with some strings. Especially on the first layer.
Hi, Thanks for your article.
I am new to these things and a bit daunted. I bought an ANYCIBIC linear plussome time ago and after a straight-forward build with good initially tests of bed-leveling and so-forth moved it to its working bench, wrongly re-connected a wire which had come adrift in transit and blew Trigorrila board. Bought replacement board and installed but got lost trying to configure Marlin. Then busy with other stuff so the pKossel has just been sitting there for about 6 months!
I’m ready to have anpther go using your info but confidence is at a minimum.
Already stuck as to where to find the configuration of PID values for the original V5 J-Head. I would be very grateful for your help with this. I’ll probably have some other stupid questions to ask later.
Hi, you don’t need to find any PID values.
Just do a PID calibration, that is always the best option.
Awesome guide! I have owned kossel plus now for 4 months, and wanted to get rid of the stock firmware – this helped me get everything set up!
Next step: V6 upgrade (probably) 🙂
Thank you for your feedback.
It is always nice to hear/read something positive 😀
Hi Lukas,
thanks a lot for your guide!
Do you know what setting I have to use for and SKR 1.3 with TMC2209 (V3 from Fysetc)?
And is there a newer configuration as Marlin is already on 2.0.3?
Best regards
Mischa
Hi, you are welcome.
Look for a bigtreetech GIT, look for a SKR manual.
Compare Fysetc and Bigtreetech driver pins, set it to UART and connect it by the manual.
There is no need to upgrade from 2.0.0 to 2.0.3, there is no major difference.
Hello Lukas,
I’ve got the kossel linear and updated to your Marlin 2.0 my bed is 200mm, aluminum heatbed with glass bed and my probe is V 2. What do I have to change in config.h? After the upgrade it won’t do auto calibration. Please any advice.
What do you mean by “After the upgrade it won’t do auto calibration.”?
All steps should be mentioned in the guide, such as rod lenght, bed radius and so on.
Follow the next guides about calibration.